
I have a confession. For years, I thought German Chocolate Cake was just… okay. It always seemed a bit dry, and the frosting, while good, could never quite make up for it. It felt like a dessert with a great idea but a slightly flawed execution.
Then one day, I was fiddling in the kitchen, craving that classic coconut-pecan-chocolate combination but without the effort of baking a full cake. That’s when the lightning bolt struck: cheesecake. A rich, creamy, no-bake cheesecake.
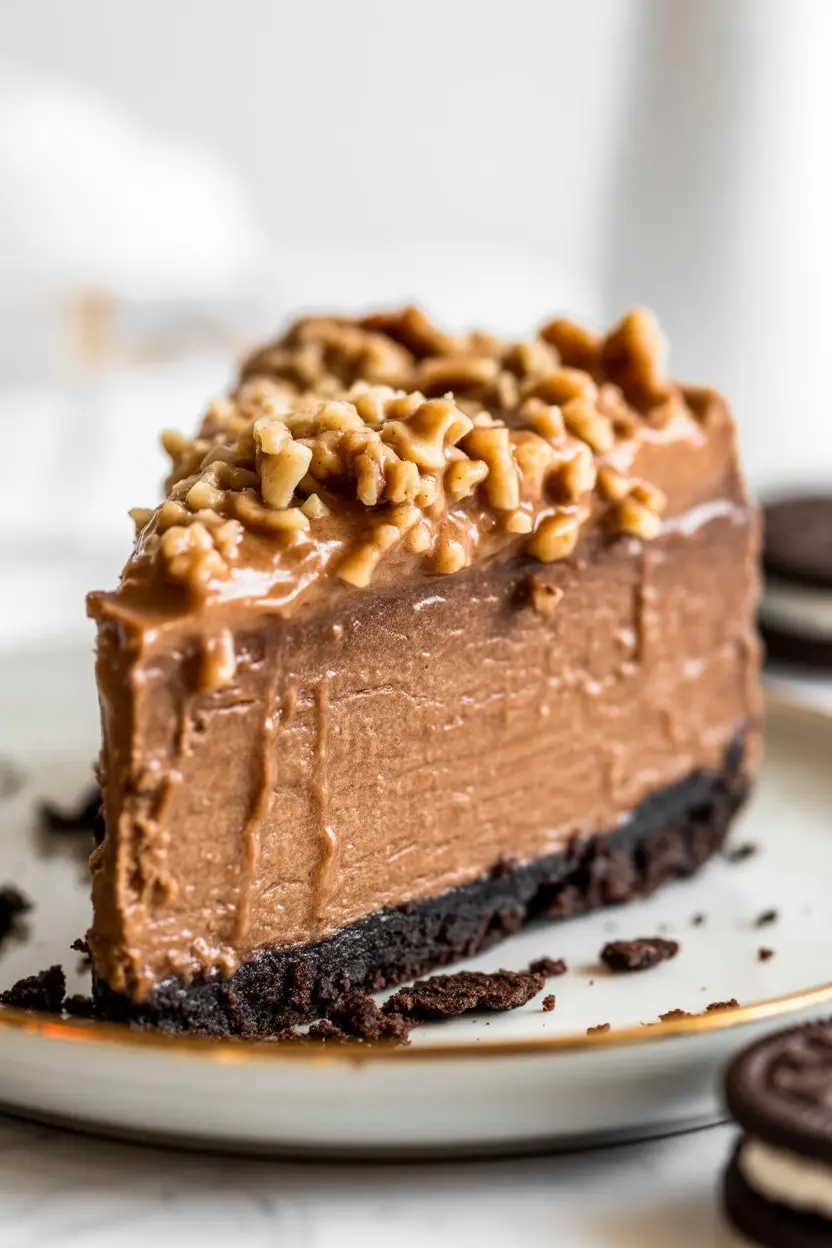
This recipe transforms all the best parts of German Chocolate Cake into a dessert that’s truly spectacular. We’re talking a crunchy chocolate cookie crust, a velvety smooth chocolate cheesecake filling, and that glorious, gooey, coconut-pecan topping. It’s pure indulgence, and the best part is your oven gets to take the day off.
Forget everything you thought you knew about this classic flavor. This no-bake version is a game-changer.
What You’ll Need
Here’s a look at the ingredients. I’ve broken them down by layer to keep things simple as you shop and prep.
For the Chocolate Crust:
- 24 Oreo cookies (or similar chocolate sandwich cookies)
- 6 tablespoons unsalted butter, melted
For the Chocolate Cheesecake Filling:
- 16 ounces cream cheese, softened to room temperature
- 1 cup powdered sugar
- 1/2 cup unsweetened cocoa powder
- 1 teaspoon vanilla extract
- 4 ounces semi-sweet chocolate, melted and cooled
- 1 cup heavy whipping cream, cold
For the Coconut Pecan Topping:
- 1 cup evaporated milk
- 1 cup granulated sugar
- 3 large egg yolks, lightly beaten
- 1/2 cup unsalted butter, cut into pieces
- 1 teaspoon vanilla extract
- 1 1/3 cups sweetened shredded coconut
- 1 cup chopped pecans, toasted
Tools Required
You don’t need a lot of fancy equipment for this recipe, which is part of its charm. Here are the essentials:
- 9-inch springform pan
- Food processor or a zip-top bag and rolling pin
- Electric mixer (stand or hand-held)
- Medium saucepan
- Mixing bowls
- Spatula
- Measuring cups and spoons
Pro Tips
After making this cheesecake more times than I can count, I’ve picked up a few tricks. These tips will help you get it perfect on your very first try.
- Room Temperature is Key: I can’t stress this enough for the filling. Your cream cheese MUST be fully softened. Cold cream cheese results in a lumpy filling, no matter how much you beat it. Take it out of the fridge at least an hour before you start.
- Toast Your Nuts (and Coconut!): The recipe calls for toasted pecans, and for good reason. Toasting brings out their natural oils and deepens their flavor. You can also lightly toast your coconut on a dry skillet for a few minutes to enhance its nuttiness. It makes a huge difference.
- Don’t Rush the Chill: The hardest part of any no-bake recipe is the waiting. This cheesecake needs at least 6-8 hours in the fridge to set up properly. If you cut into it too soon, you’ll have a soupy mess. Plan ahead and let it chill overnight for the best results.
- The “Melt and Cool” Step: When melting the chocolate for the filling, let it cool for a few minutes before adding it to the cream cheese mixture. If it’s too hot, it can cause the cream cheese to get a weird texture. You want it liquid, but not scalding.
How to Make No-Bake German Chocolate Cheesecake
Ready to build this masterpiece? Let’s do it step by step. It’s easier than you think.
Step 1: Prepare the Crust
Crush the Oreo cookies into fine crumbs using a food processor. If you don’t have one, place them in a large zip-top bag and smash them with a rolling pin. It’s a great way to get out some aggression.
In a small bowl, mix the cookie crumbs with the melted butter until it looks like wet sand. Press this mixture firmly and evenly into the bottom of a 9-inch springform pan. Use the bottom of a glass to pack it down tightly. Place the crust in the freezer to set while you make the filling.
Step 2: Make the Chocolate Filling
In a large bowl, use an electric mixer to beat the softened cream cheese until it’s completely smooth and creamy. Add the powdered sugar and cocoa powder, mixing on low speed at first (to avoid a chocolate cloud), then increasing to medium-high until combined.
Mix in the vanilla extract and the cooled, melted semi-sweet chocolate until just incorporated. Be careful not to overmix.
In a separate, chilled bowl, whip the cold heavy cream until stiff peaks form. Gently fold about one-third of the whipped cream into the chocolate mixture to lighten it. Then, fold in the remaining whipped cream until no white streaks remain. You want to keep as much air in the mixture as possible.
Pour the filling over your chilled crust and spread it into an even layer with a spatula. Cover the pan with plastic wrap and refrigerate for at least 6 hours, or preferably overnight.
Step 3: Create the Coconut Pecan Topping
While the cheesecake chills, make the topping. In a medium saucepan, combine the evaporated milk, granulated sugar, and egg yolks. Cook over medium heat, stirring constantly, until the mixture thickens and can coat the back of a spoon. This usually takes about 10-12 minutes. Don’t let it boil.
Remove the saucepan from the heat. Immediately stir in the butter pieces and vanilla extract until the butter is fully melted and integrated. Finally, stir in the shredded coconut and toasted pecans.
Let the topping cool completely to room temperature. You can speed this up by placing it in the fridge, stirring occasionally. You don’t want to pour warm topping onto your cold cheesecake.
Step 4: Assemble and Serve
Once the cheesecake is firm and the topping is cool, pour the topping over the cheesecake. Spread it evenly to the edges. Return the cheesecake to the fridge for at least 30 more minutes to allow the topping to set up slightly.
When ready to serve, run a thin knife around the edge of the pan before releasing the springform collar. Slice with a sharp, clean knife, and enjoy!
Substitutions and Variations
Want to tweak the recipe? No problem. Here are a few tested ideas that work great.
| Component | Substitution/Variation | Notes |
|---|---|---|
| Crust | Graham Cracker Crust | Use 1.5 cups crumbs, 1/4 cup sugar, 6 tbsp butter. |
| Crust | Gluten-Free | Use gluten-free chocolate sandwich cookies. |
| Topping | Nut-Free | Swap pecans for toasted pumpkin seeds or oats. |
| Filling | Darker Chocolate | Use bittersweet chocolate (60-70% cacao). |
Make-Ahead Tips
This dessert is a fantastic choice for entertaining because it has to be made in advance.
You can prepare the entire cheesecake, topping and all, up to 2 days before you plan to serve it. Just keep it covered in the refrigerator.
The flavor actually deepens and gets better on the second day, so I highly recommend making it a day ahead.
Nutritional Info, Pairings, and Efficiency
Let’s talk about the details that can make your cooking experience even better.
| Category | Suggestions & Tips |
|---|---|
| Nutrition* | High in calories and fat. Enjoy as a special treat! |
| Keto Swap | Use almond flour crust, keto sweetener, and sugar-free chocolate. |
| Pairings | A strong cup of black coffee or a glass of cold milk. |
| Efficiency | Make the topping while the crust is in the freezer. |
*Nutritional information is an estimate and will vary based on the specific ingredients used.
Leftovers and Storage
If you somehow end up with leftovers, proper storage is crucial to keep it tasting great.
Cover the cheesecake tightly with plastic wrap or store it in an airtight container in the refrigerator. It will stay fresh and delicious for up to 4 days.
You can also freeze this cheesecake. For best results, freeze individual slices on a baking sheet until firm, then wrap each slice in plastic wrap and foil. It will keep in the freezer for up to 2 months. Thaw slices in the fridge for a few hours before serving.
Frequently Asked Questions
Q1. My cheesecake filling seems too soft. What went wrong?
Ans: This usually happens for two reasons. First, you might not have whipped the heavy cream to stiff peaks. The air in the cream is essential for structure. Second, the cheesecake simply needs more time to chill. Be patient and give it the full 6-8 hours.
Q2. Can I make this in a regular pie dish instead of a springform pan?
Ans: Yes, you can use a 9-inch deep-dish pie plate. The only challenge is serving it, as you won’t be able to remove the sides. It will still taste just as amazing, but the slices might not be as clean.
Q3. My coconut topping is runny. How can I fix it?
Ans: A runny topping means it wasn’t cooked long enough on the stovetop. You need to cook it, stirring constantly, until it visibly thickens. If it’s already cooled and still runny, you can try returning it to the pan and cooking it for a few more minutes, but this can be tricky. It’s best to get it right the first time.
Q4. Can I use unsweetened coconut?
Ans: You can, but it will change the flavor profile of the topping, making it less sweet. If you prefer a less-sweet dessert, it’s a perfectly fine substitution.
Wrapping Up
There you have it—a dessert that delivers on all the nostalgic flavors of German Chocolate Cake but in a cooler, creamier, and arguably more delicious form. The combination of textures and the rich chocolate flavor is truly something special.
I really hope you give this recipe a try. It’s a showstopper for parties, holidays, or just a Tuesday night when you need a little something extra.
If you make it, I’d love to hear how it went! Drop a comment below with your experience or any questions you might have. Happy (no) baking!