
Okay, let’s be real. Sometimes you get a craving for s’mores, but the idea of building a campfire, getting smoke in your eyes, and dealing with sticky marshmallow goo everywhere sounds like… a lot of work.
I love the *idea* of a campfire. The reality? Less so. That’s where these cookies come in. They are my solution to wanting that perfect gooey, chocolatey, graham cracker crunch without any of the hassle.
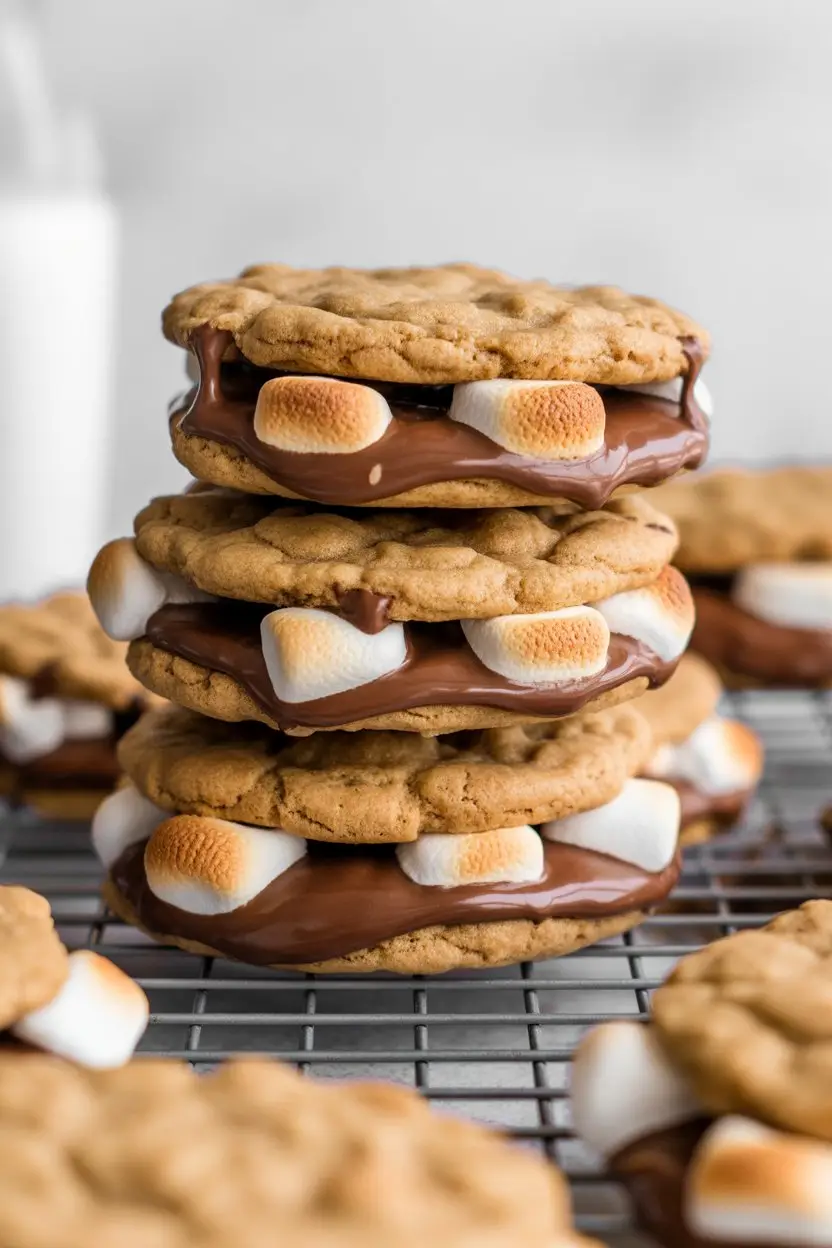
This isn’t some fancy, high-brow baking project. This is about taking three of the best things on earth and cramming them into one perfect, easy-to-make cookie.
So, if you’re ready to get all the campfire flavor without any of the actual fire, you’ve come to the right place. Let’s get to it.
What You’ll Need
Here’s the simple shopping list. Nothing too crazy, I promise. Most of this stuff might already be hiding in your pantry.
- All-Purpose Flour: 1 and 1/2 cups. The foundation of our cookie kingdom.
- Graham Cracker Crumbs: 3/4 cup. You can buy them pre-crushed or just smash up some crackers yourself (which is way more fun).
- Baking Soda: 1 teaspoon.
- Salt: 1/2 teaspoon. Don’t skip this, it makes the chocolate taste more chocolatey.
- Unsalted Butter: 1/2 cup (1 stick), melted. Melted butter is key for the texture we’re going for.
- Brown Sugar: 3/4 cup, packed. It adds that rich, caramel-like flavor.
- Granulated Sugar: 1/4 cup.
- Egg: 1 large one.
- Vanilla Extract: 2 teaspoons. Use the good stuff if you have it.
- Chocolate Chips: 1 cup. I’m a semi-sweet person, but you do you. Milk chocolate works great too.
- Mini Marshmallows: 1 cup. The mini ones are essential for even distribution of goo.
Tools Required for the Job
You don’t need a professional kitchen setup. Just a few basics will get you through this.
- Mixing Bowls (a big one and a smaller one)
- Whisk
- Spatula or Wooden Spoon
- Measuring Cups and Spoons
- Baking Sheets
- Parchment Paper (This will be your best friend during cleanup)
- An Oven (Pretty important, this one)
The Step-by-Step Guide to S’mores Glory
Alright, time for the fun part. Follow these steps and you’ll be in cookie heaven shortly.
Step 1: First things first, get your oven preheating to 375°F (190°C). Line a couple of baking sheets with parchment paper. This single action will save you from scrubbing burnt sugar later. You’re welcome.
Step 2: In a medium-sized bowl, whisk together your dry ingredients: the flour, graham cracker crumbs, baking soda, and salt. Just give it a quick mix to make sure everything is evenly distributed. Set it aside.
Step 3: Grab a larger bowl. Pour in your melted butter, then add both the brown sugar and granulated sugar. Whisk them together until they’re fully combined. It should look a little grainy, and that’s perfectly fine.
Step 4: Crack your egg into the sugar mixture and pour in the vanilla extract. Whisk it all together until it’s smooth and a bit lighter in color. Don’t go crazy here, just mix until it’s combined.
Step 5: Now, dump the dry ingredients from the first bowl into your wet ingredients. Use a spatula to fold it all together. Stop mixing the second you don’t see any more dry flour streaks. Over-mixing is the enemy of a good cookie.
Step 6: Time for the good stuff. Gently fold in the chocolate chips and mini marshmallows. Try to do this with as few strokes as possible, so the marshmallows don’t get completely squished.
Step 7: Here’s a crucial move. Cover the bowl with plastic wrap and let the dough chill in the refrigerator for at least 30 minutes. This prevents the cookies from spreading into flat, sad pancakes in the oven. An hour is even better if you have the patience.
Step 8: Scoop out rounded tablespoons of dough onto your prepared baking sheets. Make sure to leave a couple of inches between them because they will spread a bit. I like to press a few extra chocolate chips and a mini marshmallow on top of each dough ball. It just looks better.
Step 9: Bake for 9-11 minutes. You’re looking for the edges to be golden brown. The centers might look a little underdone, but that’s the secret to a chewy cookie. They’ll continue to cook a bit on the hot pan.
Step 10: Let the cookies cool on the baking sheet for about 5 minutes before you even think about moving them. They need this time to set up. After 5 minutes, transfer them to a wire rack to cool completely. Or, you know, eat one while it’s still warm and gooey. I won’t tell.
Pro Tips From My Kitchen
I’ve made these cookies more times than I can count. Here are a few things I’ve learned that make a real difference.
| Tip | Why It Works |
|---|---|
| The Marshmallow Trick | Fold in most marshmallows, but save some to press on top right before baking. The ones inside melt into goo, the ones on top get toasty. |
| Don’t Skip the Chill | Seriously. Chilling the dough solidifies the butter, which means less spread and a thicker, chewier cookie. It’s not an optional step. |
| Underbake Slightly | Pull them from the oven when the center looks soft. The residual heat from the pan will finish the job, ensuring a perfectly soft center. |
| Use Chocolate Chunks | If you can, use chopped chocolate bars or chunks instead of chips. They create melty pools of chocolate instead of just specks. |
Possible Substitutions and Variations
Don’t have something on the list? Or just feel like experimenting? I get it. Here are some ideas.
- Graham Crackers: If you don’t have graham crackers, you can use crushed digestive biscuits or even shortbread cookies for a different vibe.
- Chocolate: Any kind of chocolate works. Milk chocolate for a classic s’mores taste, dark chocolate for a richer flavor, or even white chocolate chips. A mix is also amazing.
- Add-ins: Feeling wild? Try adding a half cup of chopped nuts like pecans or walnuts. A sprinkle of flaky sea salt on top before baking is also a game-changer.
- Make it Big: Instead of individual cookies, press the entire dough into a greased 8×8 inch pan and bake it as a cookie bar. You’ll need to increase the baking time to about 20-25 minutes.
Dietary Swaps and Nutritional Info
A quick note on nutrition. These are cookies. They’re meant to be a treat, so the numbers are what you’d expect. But if you have dietary needs, here are a few thoughts.
| Dietary Need | Suggested Swap |
|---|---|
| Gluten-Free | Use a 1-to-1 gluten-free all-purpose flour blend and certified gluten-free graham crackers. |
| Vegan | This one is trickier. Use vegan butter, a flax egg (1 tbsp ground flax + 3 tbsp water), and ensure your chocolate and marshmallows are dairy-free and gelatin-free. |
As for pairings, a tall glass of cold milk is the undefeated champion. Coffee is a close second. For efficiency, measure out all your ingredients before you start mixing anything. It makes the whole process smoother and feel less chaotic.
Leftovers and Storage (If You Have Any)
Let’s be honest, you might not have leftovers. But if by some miracle you do, here’s how to handle them.
Store the cookies in an airtight container at room temperature. They’ll be at their best for about 3-4 days.
Here’s a little trick: if they start to get a bit hard, stick a piece of bread in the container with them. The cookies will absorb the moisture from the bread and soften up again. It sounds weird, but it totally works.
You can also freeze the baked cookies. Just let them cool completely, then store them in a freezer-safe bag for up to 3 months. To eat, let them thaw at room temperature for a bit, or pop one in the microwave for 10-15 seconds for that fresh-out-of-the-oven experience.
Frequently Asked Questions
Here are some questions that might pop into your head while you’re baking.
Q1. Why did my cookies spread out so much and get flat?
Ans: This is almost always because the dough wasn’t chilled long enough. Chilling is the most important step for a thick cookie. It could also be that your butter was too hot when you mixed it in, or your oven temperature is off.
Q2. Can I make the dough ahead of time?
Ans: Absolutely. The dough can be made and kept in the fridge for up to 3 days. The flavor actually gets better. You can also scoop the dough into balls, freeze them on a baking sheet, and then transfer them to a freezer bag. You can bake them straight from frozen, just add a couple of extra minutes to the baking time.
Q3. My marshmallows just melted and disappeared. What happened?
Ans: This can happen if you mix the dough too much after adding them, or if your oven is too hot. Mini marshmallows are delicate. Be gentle when folding them in, and consider pressing a few on top right before they go in the oven so you get those visible, toasty spots.
Q4. Can I use a different type of sugar?
Ans: You can, but it will change the texture. Using all brown sugar will make the cookies more moist and chewy. Using all white sugar will make them a bit crispier. The combination in the recipe is what I think works best for that perfect balance.
Wrapping Up
So there you have it. A simple, no-fuss way to get your s’mores fix. These cookies are gooey, chewy, a little crunchy, and basically everything good in the world.
They’re perfect for sharing, but I also fully support hiding a few for yourself for later. You deserve it.
Now it’s your turn. Go make a batch and come back and tell me how it went. Did you make any changes? Did you eat half the dough before it even made it to the oven? Let me know in the comments below!