
“`html
Finally! Edible Brownie Cookie Dough You Can Eat By the Spoonful
Let’s be real for a second. Have you ever made a batch of brownies and spent half the time “taste-testing” the raw batter?
Yeah, me too. A lot.
There’s always that little voice in the back of your head, the one that sounds suspiciously like your mom, warning you about raw eggs and uncooked flour. It kind of ruins the fun, right?
Well, I got tired of that voice. So I decided to create something that lets us have our batter and eat it too, without any of the worry.
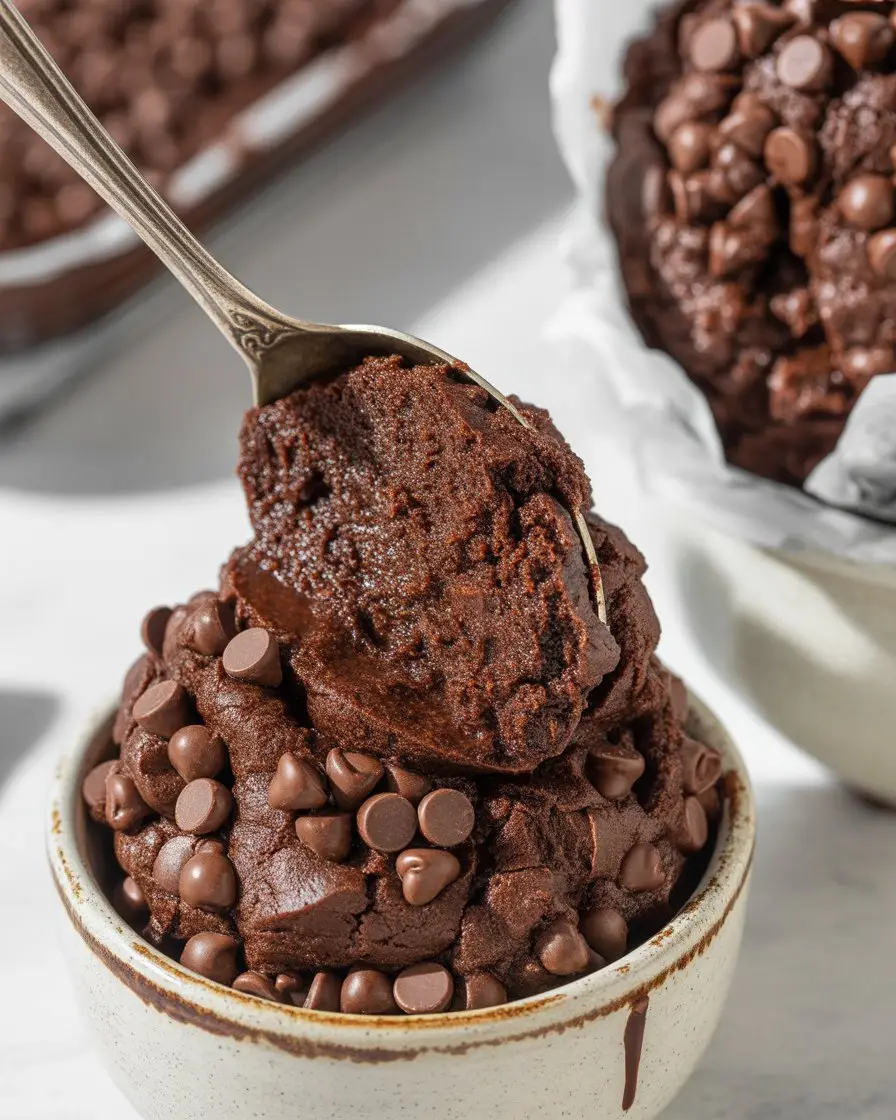
This is it. A rich, fudgy, and completely safe-to-eat brownie cookie dough. It has all the good stuff from brownie batter but is made for sneaking spoonfuls straight from the bowl. No oven required.
So grab a spoon. Let’s make something awesome.
What You’ll Need
Here’s the simple stuff you’ll need to grab. Nothing too fancy, I promise.
- 1 cup all-purpose flour
- 1/2 cup unsalted butter, softened to room temperature
- 1 cup packed light brown sugar
- 1/2 cup unsweetened cocoa powder
- 1/4 cup milk (any kind works)
- 1 teaspoon vanilla extract
- 1/2 teaspoon salt
- 1 cup chocolate chips (I like mini ones, but you do you)
Pro Tips
I’ve made this more times than I can count, and I’ve messed it up a few times so you don’t have to. Here are a few things I learned.
Heat-Treat Your Flour. Seriously.
This is the most important step for making the dough safely edible. Raw flour can carry bacteria, just like raw eggs. Toasting it for a few minutes kills anything off. Don’t skip this, it only takes 5 minutes and it’s worth the peace of mind.
Use Room Temp Butter.
If your butter is too cold, it won’t cream properly with the sugar, and you’ll get little lumps of butter in your dough. If it’s melted, your dough will be greasy. Let it sit on the counter for an hour or so until it’s soft enough to press a finger into easily.
Mini Chocolate Chips are a Game Changer.
You can totally use regular-sized chocolate chips, but mini ones get distributed so much more evenly. You get a little bit of chocolate in every single bite, which is the whole point, right?
Let It Chill.
The dough is amazing right away, but it’s even better after it’s been in the fridge for about 30 minutes. The flavors get a chance to hang out and get to know each other, and the texture becomes even more fudgy and perfect.
Tools Required
You probably already have all this stuff in your kitchen. No weird gadgets needed.
- Mixing Bowl (a nice big one)
- Electric Mixer (hand or stand mixer) or a Whisk and some arm strength
- Baking Sheet
- Spatula
- Measuring Cups and Spoons
Substitutions and Variations
Don’t have something on the list? Or just want to mix it up? I got you. Here are some easy swaps.
| Ingredient | Substitution | A Quick Note |
|---|---|---|
| Light Brown Sugar | Dark Brown Sugar or Coconut Sugar | Dark brown sugar gives a deeper molasses flavor. |
| Unsalted Butter | Vegan Butter or Coconut Oil (solid) | Makes it dairy-free. Keep the measurements the same. |
| All-Purpose Flour | 1-to-1 Gluten-Free Baking Flour | Perfect for a gluten-free version. Remember to heat-treat it! |
| Milk | Almond, Soy, or Oat Milk | Any non-dairy milk works great for a vegan version. |
| Chocolate Chips | Chopped Nuts, Sprinkles, M&Ms | Go wild! Add whatever mix-ins sound good to you. |
How To Make Edible Brownie Dough
Alright, let’s get to the good part. It’s super simple.
Step 1: First, we gotta deal with the flour. Spread your 1 cup of all-purpose flour on a baking sheet. Pop it into an oven preheated to 350°F (175°C) for about 5 minutes. You can also microwave it in a bowl on high for about 60-90 seconds, stirring every 30 seconds. Just let it cool down before you use it.
Step 2: While the flour is cooling, grab your big mixing bowl. Add the softened butter and the brown sugar. Using your electric mixer, beat them together on medium speed until the mixture is light and fluffy. This usually takes 2-3 minutes.
Step 3: Add the unsweetened cocoa powder, vanilla extract, and salt to the bowl. Mix it all up again on low speed until everything is just combined. Scrape down the sides of the bowl with your spatula to make sure you get everything.
Step 4: Pour in the milk and mix on low until it’s fully incorporated. Your dough should be starting to look like, well, dough!
Step 5: Now, add your cooled, heat-treated flour. Mix on the lowest speed until there are no more white streaks. Don’t overmix it here; just mix until it comes together.
Step 6: The best for last. Gently fold in your 1 cup of chocolate chips with the spatula. That’s it! You can dig in right away or, like I suggested, let it chill in the fridge for a bit for the best texture.
Nutrition, Pairings, and Other Good Stuff
Here’s a quick rundown of some extra info you might find helpful. Because sometimes it’s nice to know these things.
| Helpful Information | |
|---|---|
| Nutrition (Approx.) | This is a treat! Calories are around 150-200 per serving (a few tablespoons). |
| Diet Swaps | Use vegan butter, non-dairy milk, and dairy-free chocolate chips for a fully vegan recipe. Use GF flour for a gluten-free version. |
| Meal Pairings | Pair with a big glass of cold milk. Or serve a scoop on top of vanilla ice cream. Or just… a bigger spoon. |
| Time Efficiency | Heat-treat the flour while your butter is softening. The whole thing comes together in under 15 minutes. Super quick. |
Leftovers and Storage
If by some miracle you have leftovers, storing them is easy.
Just scoop the brownie dough into an airtight container and stick it in the fridge. It’ll stay good for up to a week.
You can also freeze it! Roll it into a log wrapped in plastic wrap, or scoop it into a freezer-safe container. It will last for up to 3 months in the freezer. You can eat it straight from the freezer for a super chewy, cold treat.
Frequently Asked Questions
Here are some questions that might pop into your head. I’ve tried to answer them for you!
Q1. Do I really have to heat-treat the flour?
Ans: Yes, absolutely. I know it feels like a weird, extra step, but raw flour can contain E. coli. It’s not common, but it’s a risk. Toasting it for a few minutes makes this recipe 100% safe to eat, so please don’t skip it.
Q2. My dough seems a little dry/crumbly. What did I do wrong?
Ans: You didn’t do anything wrong! This can happen sometimes depending on the brand of flour or cocoa powder. Just add a little more milk, one teaspoon at a time, until it comes together into the consistency you like.
Q3. Can I bake this dough into actual brownies?
Ans: I wouldn’t recommend it. This recipe is missing key ingredients for baking, like eggs and leavening agents (baking soda/powder). It won’t rise or set properly in the oven. It’s designed specifically for eating raw!
Q4. Can I use melted butter instead of softened?
Ans: You can, but it will change the final texture. Melted butter will result in a much softer, almost greasy dough. For that perfect, classic cookie dough texture, softened room temperature butter is definitely the way to go.
Wrapping Up
And there you have it. A super simple, incredibly delicious, and completely safe way to satisfy that brownie batter craving whenever it strikes.
It’s one of my favorite things to whip up for a movie night or when I just need a little something sweet without a ton of effort.
So go ahead and give it a try! I’d honestly love to hear how it turns out for you. If you have any questions or if you add a cool new mix-in, drop a comment below and let me know!
“`