
The Only Creamy Strawberry Cheesecake Recipe You’ll Ever Need
I have a confession to make. The first time I tried to make a cheesecake, it was a total disaster. I’m talking cracks so big you could lose a fork in them, and a texture that was more like scrambled eggs than creamy dessert.
I almost gave up. I figured cheesecake was one of those things best left to the pros at restaurants who probably have some kind of magic baking powers.
But I’m stubborn. So I kept trying, and after a LOT of not-so-great cheesecakes, I finally figured it out. I cracked the code.
This recipe is the result of all that trial and error. It’s simple, it’s pretty much foolproof, and it makes a cheesecake so creamy and delicious that people will think you secretly went to pastry school. So let’s make something awesome.
What You’ll Need
Here’s the full shopping list. Don’t let it scare you; it’s mostly basic stuff you might already have.
For the Crust:
- 1 1/2 cups graham cracker crumbs (about 10 full sheets)
- 1/4 cup granulated sugar
- 6 tablespoons unsalted butter, melted
For the Cheesecake Filling:
- 32 ounces cream cheese, softened to room temperature (this is super important!)
- 1 1/2 cups granulated sugar
- 1/2 cup sour cream, at room temperature
- 1 teaspoon pure vanilla extract
- 4 large eggs, at room temperature
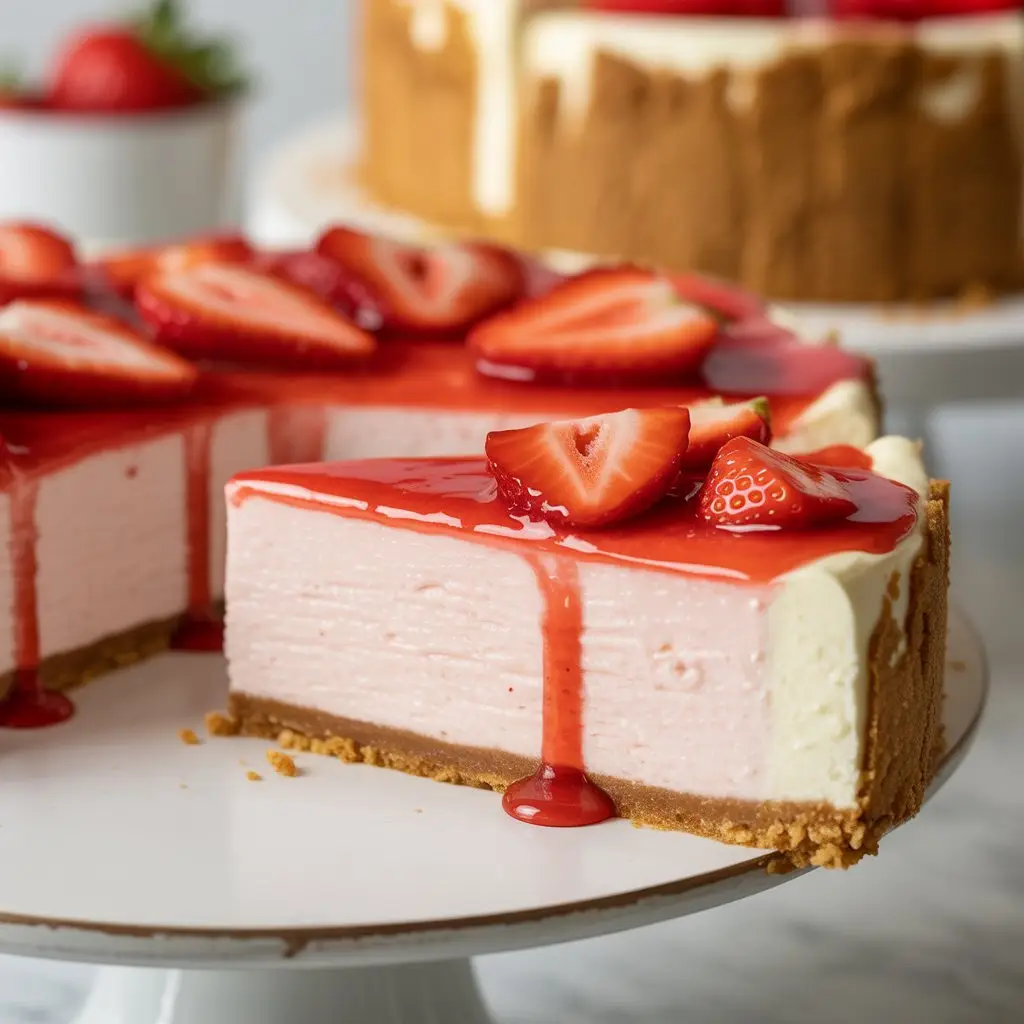
For the Strawberry Topping:
- 1 pound fresh strawberries, hulled and sliced
- 1/4 cup granulated sugar
- 1 tablespoon lemon juice
Tools Required For the Job
Having the right gear makes everything easier. You don’t need a professional kitchen, just these basics.
- 9-inch springform pan
- Large mixing bowls
- Electric mixer (handheld or stand mixer)
- Rubber spatula
- Measuring cups and spoons
- Small saucepan
- Aluminum foil
Pro Tips From My Kitchen
I learned these things the hard way so you don’t have to. Trust me on these.
- Room Temperature is NOT a Suggestion: Seriously. If your cream cheese, sour cream, or eggs are even a little bit cold, your batter will be lumpy. Set them out on the counter for at least 2-3 hours before you start. It makes all the difference for a smooth filling.
- Don’t Overmix After Adding Eggs: Once you start adding the eggs, mix on low speed and only until they are just combined. Overmixing beats too much air into the batter, which causes the cheesecake to puff up in the oven and then sink and crack as it cools.
- Embrace the Water Bath: I know, it sounds like an extra, annoying step. But a water bath (or a bain-marie if you want to be fancy) is the secret to a perfect, crack-free cheesecake. It adds moisture to the oven and helps the cheesecake bake gently and evenly.
- Cool it Down SLOWLY: Drastic temperature changes are the enemy of cheesecake. When it’s done baking, turn off the oven, crack the door open, and let the cheesecake cool inside the oven for an hour. This gradual cooling process helps prevent cracks from forming on the surface.
How To Make Creamy Strawberry Cheesecake
Alright, let’s get to it. Just follow these steps, and you’ll be in good shape.
Step 1: Prep Your Pan and Oven
Preheat your oven to 350°F (175°C). Take your 9-inch springform pan and wrap the outside bottom and sides with a few layers of heavy-duty aluminum foil. This is to keep water from the water bath from seeping into your crust.
Step 2: Make the Graham Cracker Crust
In a medium bowl, mix the graham cracker crumbs and 1/4 cup of sugar. Pour in the melted butter and stir it all together until it looks like wet sand.
Press this mixture firmly and evenly into the bottom and slightly up the sides of your prepared springform pan. You can use the bottom of a glass to help pack it down tightly. Bake the crust for 10 minutes, then set it aside to cool on a wire rack.
Step 3: Make the Cheesecake Filling
In a large bowl, use an electric mixer to beat the softened cream cheese on medium speed until it’s completely smooth and creamy. Scrape down the sides of the bowl to make sure there are no lumps.
Add the 1 1/2 cups of sugar and the sour cream. Beat on low speed until everything is combined and smooth. Stir in the vanilla extract.
Add the eggs one at a time, mixing on low speed after each one just until the yolk disappears. Remember not to overmix here! Pour the finished filling over your cooled crust.
Step 4: Bake in a Water Bath
Place your foil-wrapped springform pan into a larger roasting pan. Carefully pour hot water into the roasting pan until it comes about halfway up the sides of the springform pan.
Carefully place the whole setup into the preheated oven. Bake for 55-70 minutes. The cheesecake is done when the edges are set, but the center still has a slight jiggle to it. It shouldn’t be liquidy, just a little wobbly.
Step 5: Cool it Down
Turn off the oven but leave the cheesecake inside. Prop the oven door open with a wooden spoon and let it cool in the oven for 1 hour. This is that slow cooling trick we talked about.
After an hour, take the cheesecake out of the water bath, remove the foil, and let it cool completely on the counter. Then, cover it with plastic wrap and refrigerate for at least 6 hours, but overnight is even better. It needs to be fully chilled and set.
Step 6: Make the Strawberry Topping
While the cheesecake is chilling, you can make the topping. In a small saucepan, combine the sliced strawberries, 1/4 cup of sugar, and lemon juice. Cook over medium heat, stirring occasionally, for about 10-15 minutes.
The strawberries will break down and the sauce will thicken. Let it cool completely before using. You can either pour it over the whole cheesecake or serve it with each slice.
Possible Substitutions and Variations
Feel like mixing it up? Here are a few ideas that work great.
| Component | Substitution Idea | Notes |
|---|---|---|
| Crust | Biscoff cookies or chocolate wafers | Use the same amount as graham crackers. |
| Topping | Raspberries, blueberries, or cherries | Follow the same topping recipe. |
| Filling Flavor | Add lemon zest or almond extract | Add 1 tbsp of zest or 1/2 tsp of extract. |
Make-Ahead Tips
You can totally prep this dessert in stages, which is a lifesaver if you’re cooking for an event.
- The Crust: The crust can be baked and stored, covered, at room temperature for up to 2 days before you add the filling.
- The Topping: The strawberry topping can be made up to 3 days in advance and stored in an airtight container in the fridge.
- The Whole Cheesecake: The entire cheesecake (without the topping) can be baked and stored in the fridge for up to 3 days before serving. Just add the topping before you’re ready to slice it up.
Nutrition, Swaps, and Pairings
A little more info for those who are curious.
Estimated Nutritional Breakdown
This is just an estimate per slice (if you cut the cake into 12 slices). It’s cheesecake, so let’s just enjoy it!
| Nutrient | Approximate Amount |
|---|---|
| Calories | 450-500 kcal |
| Fat | 30g |
| Carbohydrates | 35g |
| Protein | 8g |
Ingredient Swaps for Different Diets
- Gluten-Free: Easy! Just use your favorite gluten-free graham-style crackers or a nut-based crust made from almond flour.
- Lower Sugar: You can experiment with sugar substitutes like erythritol or monk fruit in both the filling and topping. Just check the conversion rates on the package, as they aren’t always 1:1 with sugar.
Meal Pairing Suggestions
This cheesecake is pretty rich, so it’s a great grand finale to a meal. It pairs really well with a strong cup of coffee or an espresso.
If you’re serving it after a big dinner, a simple cup of black tea can also be a nice, light contrast.
Cooking Time Efficiency Tips
To make things go faster, get all your ingredients out and measured before you start mixing anything. This is what chefs call “mise en place” and it’s a total game-changer.
You can also make the crust while the oven is preheating and let it cool while you mix up the filling. Small bits of multitasking help!
Tips for Leftovers and Storage
If you somehow have leftovers, here’s how to keep them tasting great.
Store the cheesecake in an airtight container in the refrigerator. It will stay fresh and delicious for up to 4-5 days.
You can also freeze it! Place individual slices on a baking sheet and freeze until firm. Then, wrap each slice tightly in plastic wrap and then foil. It will keep in the freezer for up to a month. Just thaw it in the fridge overnight before eating.
Frequently Asked Questions (FAQ)
Q1. Why did my cheesecake crack?
Ans: This is the most common cheesecake problem! It’s usually caused by one of three things: overmixing the batter (especially after adding eggs), not using a water bath, or cooling it too quickly. The tips above should help you avoid this.
Q2. Can I use frozen strawberries for the topping?
Ans: Absolutely. You don’t even need to thaw them first. Just put them in the saucepan and cook as directed. You might need to cook them a few minutes longer to get all the extra water to evaporate.
Q3. My cheesecake seems undercooked or runny in the middle. What happened?
Ans: It probably just needed more time in the oven. Ovens can vary, so yours might run a little cooler. A perfect cheesecake will still have a slight jiggle in the very center when you take it out. If it’s more liquid than jiggle, it needs more time. The long chilling time is also essential for it to fully set up.
Q4. Do I really, truly have to use a springform pan?
Ans: It’s highly recommended. A springform pan has removable sides, which is the only easy way to get a delicate cheesecake out without destroying it. If you don’t have one, you could try making it in a 9-inch deep-dish pie plate, but you’ll have to serve it by scooping it out of the pan.
Wrapping Up
So there you have it. A cheesecake recipe that’s designed to work, even if you’ve had kitchen disasters in the past. It’s all about a few simple techniques.
The creamy texture and the fresh strawberry topping are just so good together. It’s the perfect dessert for a special occasion, or just because you feel like making something incredible on a Tuesday.
Give it a try. I promise you can do it. And when you do, I’d love for you to come back and leave a comment. Tell me how it went, if you made any changes, or if you have any questions!