
You know those mornings when you just need a little something extra? Not a kale smoothie. Not overnight oats. I mean something warm, golden, slightly crisp on the outside, soft and sweet on the inside… basically something that makes you want to throw on your coziest socks, turn on a feel-good playlist, and actually sit down to enjoy breakfast for once.
This Hawaiian Roll French Toast is that something.
It’s the type of recipe that makes you feel like you’re doing the absolute most, even when you’re really just standing in your kitchen flipping rolls in butter. It’s quick. It’s delicious. It looks like it took a ton of effort (it didn’t). And it hits all the right notes — sweet, buttery, custardy, with just the right amount of cinnamon.
And yes, it uses Hawaiian rolls. So you already know this is going to be good.
What You’ll Need
Ingredients:
- 1 pack of Hawaiian sweet rolls (12-count)
- 2 large eggs
- 3/4 cup half and half (or whole milk)
- 1 tablespoon brown sugar
- 1 teaspoon vanilla extract
- 1/4 teaspoon ground cinnamon
- 2 tablespoons unsalted butter (for the pan)
- Powdered sugar (optional but encouraged)
- Maple syrup (just… yes)
- Berries or whipped cream (if you’re feeling fancy)
Let’s talk about the taste for a second.
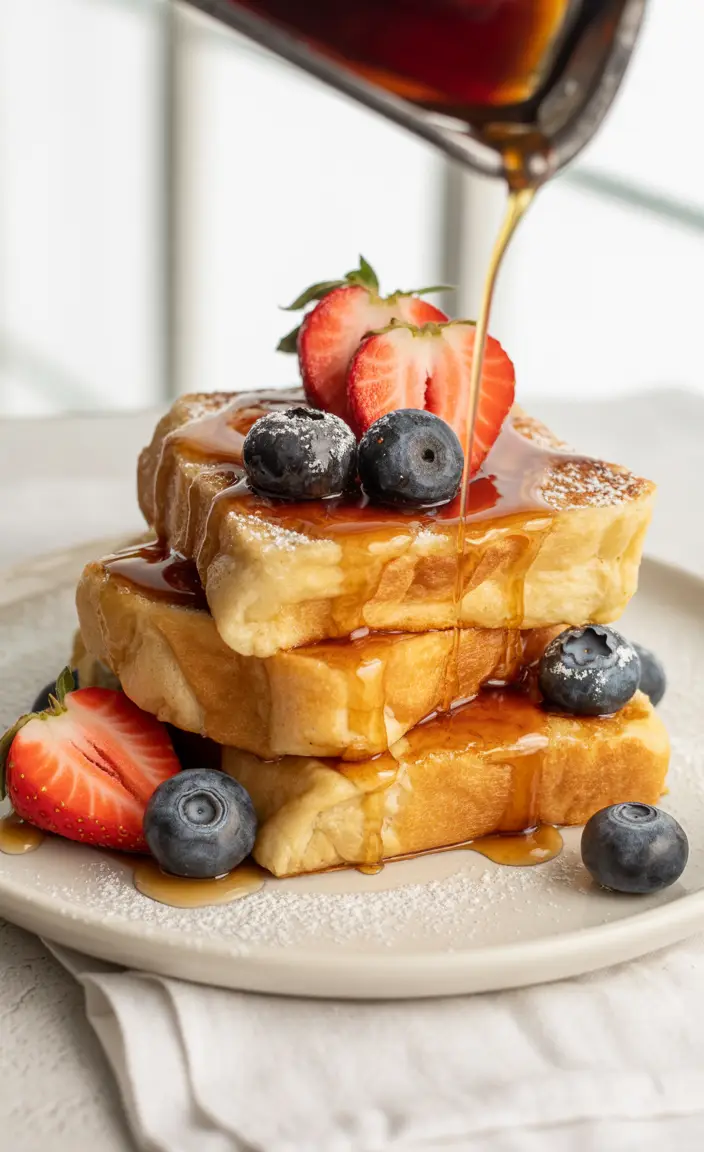
These rolls soak up all that vanilla-cinnamon custard like little sponges. But they don’t fall apart. No soggy disasters here. Just perfect, golden-brown nuggets of breakfast joy. And when you hit them with a light dusting of powdered sugar and a pour of warm maple syrup? Ohhh. You’re welcome.
The Tools
Nothing wild. You probably already have everything:
- Mixing bowl
- Whisk
- Non-stick skillet or griddle
- Spatula
- Knife (for cutting rolls apart)
- Plate with paper towel (optional, for draining if you go heavy on the butter)
Pro Tips Before You Get Cooking
- Use Day-Old Rolls If You Can: They hold up better. Slightly stale bread always makes better French toast. If they’re fresh, you can leave them out of the package for a few hours.
- Don’t Soak Too Long: A quick dunk in the custard is enough. The rolls are soft already, and you want them coated, not collapsing.
- Low and Slow Wins: Medium-low heat gives you that golden crust without burning the outside before the inside warms through.
- Flip All Sides: These aren’t slices. They’re rolls. So cook them like little cubes. Get the tops, bottoms, and sides.
- Batch Cook and Keep Warm: If you’re making a lot, preheat your oven to 200°F and keep finished ones warm on a baking tray.
How to Make It (Full Instructions)
- Cut the Hawaiian rolls apart and separate them into individual pieces. You don’t need to slice them open unless you want to get wild and stuff them with something. (See variations below.)
- In a bowl, whisk together the eggs, half and half, brown sugar, vanilla extract, and cinnamon until smooth.
- Heat a non-stick skillet over medium-low heat. Add a small amount of butter and let it melt.
- Quickly dip each roll into the custard mixture, coating all sides, then place onto the skillet.
- Cook until golden brown on the bottom, then rotate the rolls to cook every side evenly. Keep going until the outside is crispy and the inside is warm.
- Serve warm with powdered sugar, maple syrup, and whatever toppings make your heart happy.

Substitutions and Variations
This recipe is totally flexible. Here are a few ways to switch it up:
- Dairy-Free: Use almond milk or oat milk and a plant-based butter.
- Gluten-Free: Swap with your favorite GF sweet rolls. Just make sure they’re soft and slightly sweet.
- Stuffed French Toast Bites: Slice rolls in half and add cream cheese or fruit preserves before dipping in the custard.
- Extra Spice: Add a pinch of nutmeg or pumpkin pie spice to the custard.
- Coconut Vibes: Add a splash of coconut milk or shredded coconut to the mix.
Make Ahead Tips
Want to make life even easier?
- Pre-mix the custard the night before: Just whisk and refrigerate. Give it a stir before using.
- Pre-slice rolls and keep them slightly uncovered overnight: That makes them firmer and even better for soaking.
- Cook in advance and reheat in the oven: Set your oven to 300°F, lay them on a baking tray, and warm them up for 10 minutes. Still delicious.
Leftovers and Storage
Got extras? Here’s what to do:
- Fridge: Store cooled rolls in an airtight container for up to 3 days.
- Reheat: Pop them in the oven or toaster oven to bring back the crisp. Microwave works too, but they’ll be softer.
- Freeze: Freeze cooked rolls in a single layer first, then transfer to a bag. Reheat in oven straight from frozen.
Additional Details
Nutrition Breakdown (Per 2 rolls, estimated):
- Calories: ~220
- Protein: 6g
- Fat: 10g
- Carbs: 28g
- Sugar: 8g
Dietary Notes:
- Can easily be made dairy-free
- Already vegetarian
- Sweet and indulgent, but customizable to your lifestyle
Meal Pairing Ideas:
- Pair with scrambled eggs or turkey sausage for a more balanced plate
- Serve with a fruit salad for a bright, fresh contrast
Time-Saving Tip:
- Use two skillets or a large griddle to speed things up if you’re feeding a crowd
FAQ
Do I have to use Hawaiian rolls? Technically no, but also yes. The unique sweet-and-soft texture makes this recipe shine. Regular dinner rolls don’t come close.
Can I make this in the oven? You could bake them in a casserole-style dish (like a pull-apart French toast bake), but it’s not quite the same texture. Pan-searing gives the best crust.
Can I use pre-cut mini brioche buns instead? Sure. Just note they might be richer and slightly less sweet than Hawaiian rolls. Still delicious, though.
Can I freeze these raw? Not ideal. The custard doesn’t freeze great. Cook first, then freeze.
Wrap Up
This is the kind of recipe that’s made for cozy Saturdays, surprise brunch guests, or days when cereal just isn’t cutting it. It feels indulgent, tastes amazing, and still somehow comes together in under 20 minutes.
So give it a go. Try a batch this weekend. Then come back here and let me know how it turned out. Did you stick with the classic version or go wild with some cream cheese filling? I want to hear it all.
And if you have questions? I’m just a scroll away.
Now go get those rolls. Your future self is already thankful.