
If you’ve ever looked at a couple of sad bananas on your counter and thought, “I should really use those for something,” you’re not alone. You stare at them like they personally offended you by ripening too fast, and now your only two options are: banana bread (again) or tossing them (which feels rude). But what if there was a third option?
A cold, creamy, dreamy third option that’s so good you’ll start letting bananas go soft on purpose?
That’s this recipe.
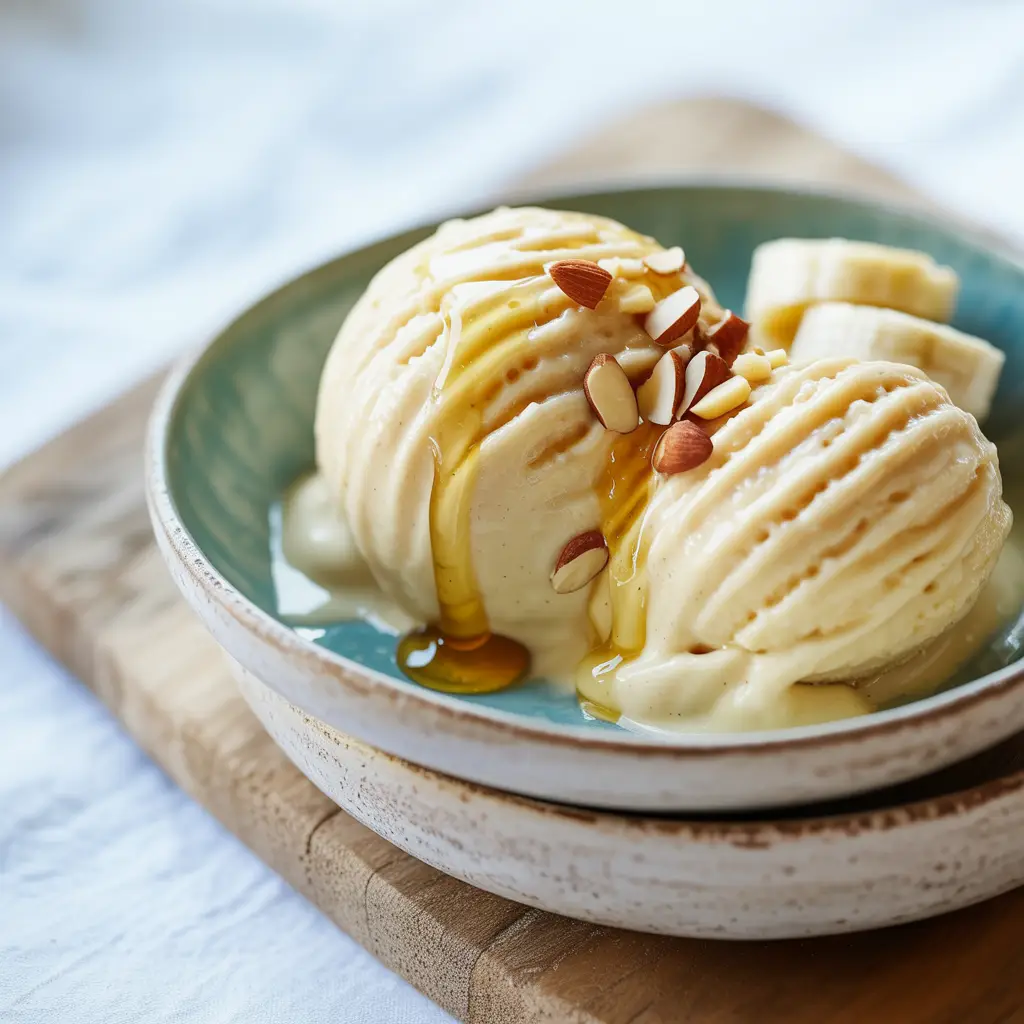
This banana honey “ice cream” isn’t just another frozen dessert—it’s your new go-to for something sweet, simple, and surprisingly satisfying. And even better? You don’t need an ice cream machine, hours of prep, or a long grocery list. If you’ve got a freezer and a blender, you’re already halfway there.
Let’s make something amazing (and actually doable).
What You’ll Need
Here’s the simple breakdown. Nothing fancy. Nothing weird. Just good stuff that comes together to make something kinda magical.
Ingredients:
- 3 ripe bananas (the spottier, the better)
- ¼ cup thick Greek yogurt (or coconut yogurt if you’re dairy-free)
- 2 tablespoons honey (adjust to taste)
- 1 teaspoon vanilla extract
That’s it. Four ingredients. No tricks, no powders, no syrups from another galaxy.
Tools:
- Freezer-safe container or zip-top bag
- Baking tray and parchment paper (optional but helpful)
- Food processor or high-speed blender
- Spoon or ice cream scoop
If you’ve got those, you’re ready.
Why This Recipe Works (Even If You’ve Never Made “Ice Cream” Before)
Here’s the thing: this isn’t “ice cream” in the traditional sense. There’s no cream. No eggs. No churning. But the texture? Shockingly close. And the taste? Sweet, light, and way more satisfying than you’d expect from something this easy.
The bananas do the heavy lifting. When frozen and blended, they turn silky and rich, with a texture that’s ridiculously close to soft serve. Add yogurt for a bit of tang and creaminess, honey for that mellow sweet finish, and vanilla to round it all out.
No one will miss the heavy cream. Promise.
The Step-By-Step Breakdown
You’re probably not here for a long read on the history of frozen bananas. You want results. So here’s exactly what to do.
1. Slice and freeze your bananas.
Peel them first (don’t skip this unless you want to fight frozen peels), then slice into coins. Spread them out on a parchment-lined tray and pop in the freezer until solid—usually overnight.
If you don’t want to wait, a few hours will do the trick. Just make sure they’re fully frozen before you blend.
2. Let them thaw for just a minute.
Take your bananas out and let them sit on the counter for about 3–5 minutes. You don’t want them soft—just slightly thawed so your blender doesn’t revolt.
3. Add everything to the blender.
Throw in the frozen banana slices, Greek yogurt, vanilla, and honey. Blend until smooth. Scrape down the sides if things get stuck.
This will take a little patience. It’ll look crumbly before it turns creamy. Keep going. It gets there.
4. Taste and adjust.
Too thick? Add a splash of milk or more yogurt. Not sweet enough? A bit more honey. Want something extra? Toss in a handful of berries, a spoonful of peanut butter, or even a dash of cinnamon. You’re the boss here.
5. Serve immediately—or freeze for later.
It’s amazing straight out of the blender if you like a soft-serve vibe. If you want something firmer, spoon it into a container and freeze for 30–60 minutes.
Pro Tips (From Someone Who’s Messed This Up Before)
- Use bananas that are ripe—but not leaking. There’s a fine line between ripe and I should’ve thrown this out yesterday. You want brown spots, not fruit flies.
- Don’t blend everything at once. Start with just the bananas. Get them going first, then add the yogurt and honey. It blends smoother and saves your blender from dying a tragic early death.
- Don’t overthink it. This isn’t a fancy, fussy dessert. It’s supposed to be easy. If you forgot to freeze the bananas and they’re getting too ripe, just slice and freeze them now. Come back later. They’ll wait.
- Serve it with toppings. A little granola, chopped nuts, or dark chocolate on top? Game changer.
- Make it in bulk. If you’ve got extra bananas, slice and freeze them in batches. Then all you have to do is toss them in the blender when the craving hits.
Substitutions and Variations
This recipe is super flexible, which is great because sometimes you’re working with what you’ve got.
- No Greek yogurt? Use regular yogurt. Or coconut yogurt. Or even coconut cream if you want something extra rich.
- No honey? Maple syrup, agave, or date syrup all work. Or skip it if your bananas are sweet enough.
- Add-ins that go well: Berries, cocoa powder, almond butter, cinnamon, shredded coconut, or a scoop of protein powder for a post-workout treat.
You can also swap the vanilla for almond extract if you want something slightly different. Just go light—it’s strong.
Can You Make This Ahead?
Yep. Here’s how.
Make a batch, then freeze it in a container with a lid. When you’re ready to eat, let it sit on the counter for 10–15 minutes to soften. It’ll be firmer than when freshly blended, but still scoopable and delicious.
It’s best within the first 1–2 weeks, but you can technically freeze it for up to a month.
Storage & Leftovers
- Fridge: Not ideal. It’ll turn brown and watery. Keep it frozen.
- Freezer: Store in an airtight container. Press a piece of parchment or plastic wrap against the top to help prevent ice crystals.
This doesn’t keep quite like store-bought ice cream, so plan to enjoy it within a week or two for the best texture.
Extra Details That’ll Help
Nutrition Info (rough estimate per ½ cup):
- Calories: 130–150
- Protein: 3–5g (depending on yogurt)
- Carbs: 25g
- Fat: 2g
- Sugar: 18g (natural from banana + honey)
Want to make it even lighter? Use plain nonfat yogurt and skip the honey. Want to bulk it up for a snack? Add a spoonful of nut butter.
For special diets:
- Vegan? Use coconut yogurt + maple syrup. Done.
- Low-sugar? Skip the honey. The banana alone can carry it.
- Dairy-free? Coconut-based yogurts work beautifully.
Time-saving tip:
Keep frozen banana slices in your freezer at all times. Seriously. They’re gold. Use them in smoothies, ice cream, pancakes—you name it.
What To Eat With It
This “ice cream” works well on its own, but if you want to get a little extra:
- Spoon it over pancakes or waffles (especially on a weekend morning when you’re trying to be good…ish).
- Layer it in a parfait with granola and fruit.
- Use it as a topping for oatmeal (yes, cold + hot together—it works).
- Serve alongside a warm cookie. Balance, right?
FAQs
Is this just blended bananas? Not quite. The yogurt, honey, and vanilla take it from “baby food” to “actual dessert.”
Can I skip the honey? Yes. If your bananas are super ripe, you probably won’t even miss it.
Does it taste like real ice cream? It’s not going to replace that pint of Ben & Jerry’s after a breakup. But for an everyday sweet treat? It’s surprisingly close—and way more nourishing.
Can I use a regular blender? If it’s a strong one, sure. If it’s older or less powerful, let your bananas thaw a bit longer before blending.
Can kids eat this? Absolutely. It’s just fruit, yogurt, and a touch of honey. Kids love it, especially with chocolate chips or sprinkles on top.
Wrap Up
This recipe is the definition of low effort, high reward.
It’s the kind of thing you’ll make once and then find yourself making again… and again. It’s that easy. It’s that good. And it turns those too-ripe bananas from “ugh” to “oooh yes.”
Try it. Tweak it. Top it with all your favorites. Then come back and tell me how it went. What did you add? What would you change? Did you eat it all in one sitting? (No judgment.)
I love hearing how you make these recipes your own. So don’t be shy—drop your thoughts, questions, or your own killer banana creation in the comments below.
Here’s to ice cream that doesn’t require a PhD in dessert-making. Just you, a blender, and a couple of spotty bananas. Let’s go.