
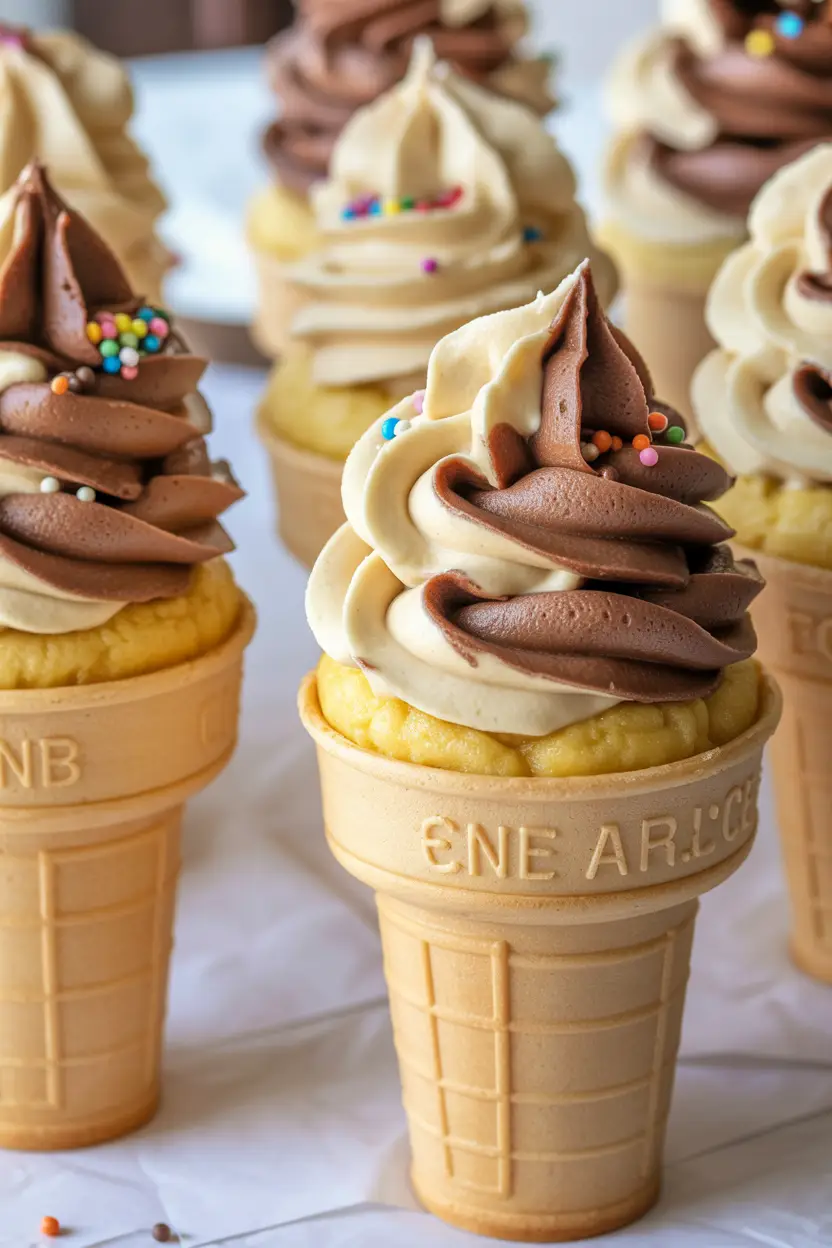
So imagine this: you’re holding an ice cream cone, but instead of it melting all over your hand and down your wrist, it stays perfectly intact. And instead of ice cream inside, there’s actual cake. Yep—light, fluffy, vanilla cake baked inside the cone. And it’s topped with a generous swirl of frosting that looks just like soft serve. Basically, it’s a cupcake in disguise, and it’s adorable.
Now maybe you’ve seen these floating around Pinterest or Instagram, or maybe you’re just in the mood to bake something that feels nostalgic and kinda fun. Either way, ice cream cone cupcakes are one of the easiest ways to impress people without actually needing a baking degree. They’re playful, ridiculously cute, and somehow taste better just because they’re in a cone.
You don’t need a fancy mold or cupcake stand. You don’t need piping skills worthy of a pastry chef. You just need a muffin pan, some flat-bottomed cones, and about an hour. The best part? These are perfect for birthdays, BBQs, or that random Tuesday when you want a treat that doesn’t feel serious.
Let’s break this down and make it happen. You’re gonna love this.
What You’ll Need
Here’s what goes into these cuties. Most of this is stuff you probably already have in your kitchen, which is always a win.
For the cupcakes:
- 12 flat-bottomed ice cream cones (you want the ones that can stand on their own)
- ¼ cup unsalted butter, softened
- ¼ cup neutral oil (vegetable or avocado works)
- ¾ cup granulated sugar
- 2 large eggs, room temperature
- 1½ teaspoons vanilla extract
- 1½ cups all-purpose flour
- 1½ teaspoons baking powder
- ¼ teaspoon salt
- ⅔ cup buttermilk
- Optional: a few tablespoons of sprinkles if you’re going the funfetti route
For the frosting:
- ½ cup unsalted butter, softened
- 8 oz cream cheese (full-fat gives best texture)
- ¼ teaspoon salt
- 1 teaspoon vanilla extract
- 4 cups powdered sugar
- ¼ cup cocoa powder (if doing chocolate swirl)
- 1 to 3 tablespoons heavy cream (to adjust consistency)
And of course, you’ll want some extra sprinkles for topping. Because we’re not monsters.
Tools You’ll Need
- Muffin pan (standard size)
- Electric hand mixer or stand mixer
- Mixing bowls (medium and large)
- Measuring cups + spoons
- Spatula
- Piping bag (or a large zip-top bag with the corner snipped off)
- Optional: jumbo star piping tip for the full “ice cream” effect
Let’s Talk About the Cones
This is not a throwaway detail. The type of cone matters. You want the flat-bottomed ice cream cones that can stand upright. These are often labeled as “cake cones.” The regular pointy sugar cones will tip and fall and probably break your baking spirit. Don’t do that to yourself.
Also, when baking, the batter will expand slightly—so leave a little room at the top of each cone. More on that in a second.
Instructions (Yes, You Can Do This)
Step 1: Get your oven ready. Preheat to 350°F (that’s 175°C if you’re not in the U.S.). Grab your muffin pan and line up your cones in each slot. This keeps them from falling over while baking. If any seem a little wobbly, you can scrunch up foil around the base for extra support.
Step 2: Make the batter. In a large bowl, beat together the softened butter, oil, and sugar until it’s smooth and fluffy. Add in the eggs one at a time. Don’t rush this part—mix until it’s fully combined and creamy. Stir in the vanilla.
In a separate bowl, whisk together the flour, baking powder, and salt. Now, alternate adding this dry mix and the buttermilk into your wet mixture. Do this in batches, starting and ending with the dry mix. Stir just until combined.
If you’re using sprinkles, fold them in gently at the very end.
Step 3: Fill the cones. Use a spoon or small scoop to fill each cone about ¾ full. The batter should stop right around the inner ridge of the cone—not all the way to the top. Overfilling can lead to muffin tops that slide off, which is a tragedy we don’t need today.
Step 4: Bake. Carefully transfer the muffin pan to your oven and bake for 20 to 23 minutes. Start checking around minute 19. You want a toothpick inserted in the center to come out clean or with a few moist crumbs.
Let the cones cool completely before frosting. Trust me, if you try to frost while they’re warm, it’ll just slide off and your swirls will be sad.

The Frosting: Let’s Swirl
For a classic “ice cream cone” look, we’re going to do two flavors: vanilla and chocolate. But if you’re short on time or just want one, go for it. Either one tastes great.
To make the frosting: In a bowl, beat the butter and cream cheese until totally smooth. Add salt and vanilla, then slowly mix in powdered sugar. Once it’s thick and fluffy, divide the frosting in half. Stir the cocoa powder into one half to make chocolate.
To swirl them, spoon each flavor into opposite sides of a piping bag. If you’ve never done this before, it’s not as hard as it sounds. Just place the bag in a tall glass to hold it upright while you fill.
Then pipe a tall, swirly tower onto each cooled cone. Like you’re pretending to work at an ice cream shop and you’re showing off.
Pro Tips (Because I’ve Messed These Up Before)
- Room temperature ingredients = magic. Cold butter or eggs can mess with the batter’s texture. Give them a little time to come to temp before starting.
- Don’t overmix. Once the flour goes in, stir gently. Overmixed batter = dense cupcakes.
- Keep your piping bag upright. This helps the swirl stay even and prevents frosting blowouts.
- Let the cones cool fully before frosting. Even if you’re impatient. Especially if you’re impatient.
- Pipe a practice swirl. Use a plate or extra cone to get the feel for it before going all-in.
Substitutions + Variations
- No buttermilk? Mix ⅔ cup milk with 2 teaspoons lemon juice or vinegar. Let it sit 5 minutes.
- Want chocolate cake instead? Swap in your favorite chocolate cupcake recipe or even a boxed mix.
- Dairy-free? Use plant-based butter, dairy-free cream cheese, and almond or oat milk.
- Gluten-free? Substitute with a 1:1 gluten-free flour blend (like Bob’s Red Mill or King Arthur’s).
- Colorful swirls: Add food coloring to the vanilla half of the frosting for party themes.
Make Ahead Tips
- You can bake the cupcakes the night before. Once cool, store them lightly covered at room temp.
- The frosting can be made 1–2 days in advance. Just cover and refrigerate. Bring to room temp and give it a quick whip before using.
I wouldn’t recommend frosting the cones too far in advance unless you’re storing them in a cooler spot. Humidity and soft cones don’t go well together.
Leftovers & Storage
Leftovers should be stored in a container that gives the frosting a little breathing room. Room temperature is fine for a day or two. If you need them to last longer, pop them in the fridge.
Just a heads up—fridge storage might soften the cones slightly. If that bugs you, unwrap them for a few minutes and let them sit out before eating.
And no, they don’t freeze well. Cones don’t bounce back from the freezer life.
Extra Notes (For My Fellow Baking Nerds)
- Each cupcake has around 325 calories depending on frosting height and sprinkles quantity (yes, that’s a real factor).
- For extra crunch, dip the rim of the cone in melted chocolate before adding batter.
- These pair well with fruit skewers, fizzy lemonade, or absolutely nothing—because they steal the show anyway.
- Great for decorating with kids, though be ready for 2x the sprinkle consumption.
FAQ
Can I use a boxed cake mix? Absolutely. Just keep the filling to ¾ full and follow the rest as-is.
Why did my cones crack? Sometimes cones are brittle. Try to buy a fresh box and handle them gently when placing in the pan.
Can I make these with other flavors? Yes! Strawberry cake, lemon batter, or even marble cupcakes all work great here.
Can I make these gluten-free? Yep. Just use a 1:1 gluten-free flour or GF boxed mix.
How do I transport them? A deep baking dish lined with foil or bubble wrap can help keep them upright. Or if you’re fancy, get a cupcake cone holder.
Wrap Up
And there you have it—ice cream cone cupcakes that are almost too cute to eat. (Almost.)
Whether you’re making them for a party, a bake sale, or just because your soul needs something playful and nostalgic, this recipe is simple, fun, and totally doable. Even if you’re new to baking. Even if your last cupcake attempt was a little… underwhelming.
So go give it a shot. Let the batter spill a little, swirl that frosting with pride, and throw on those sprinkles like you mean it.
And if you try this recipe, leave a comment below! I’d love to hear how it turned out for you, what swaps you made, or whether your frosting tower reached record heights. You’ve got this.
Happy baking.