
Let’s be honest for a second. We’ve all looked at those bananas on the counter, the ones that went from perfectly yellow to a sad, spotty brown in what feels like five minutes.
You have two choices. You can either admit defeat and toss them, or you can turn them into something amazing. Something better than just regular old banana bread.
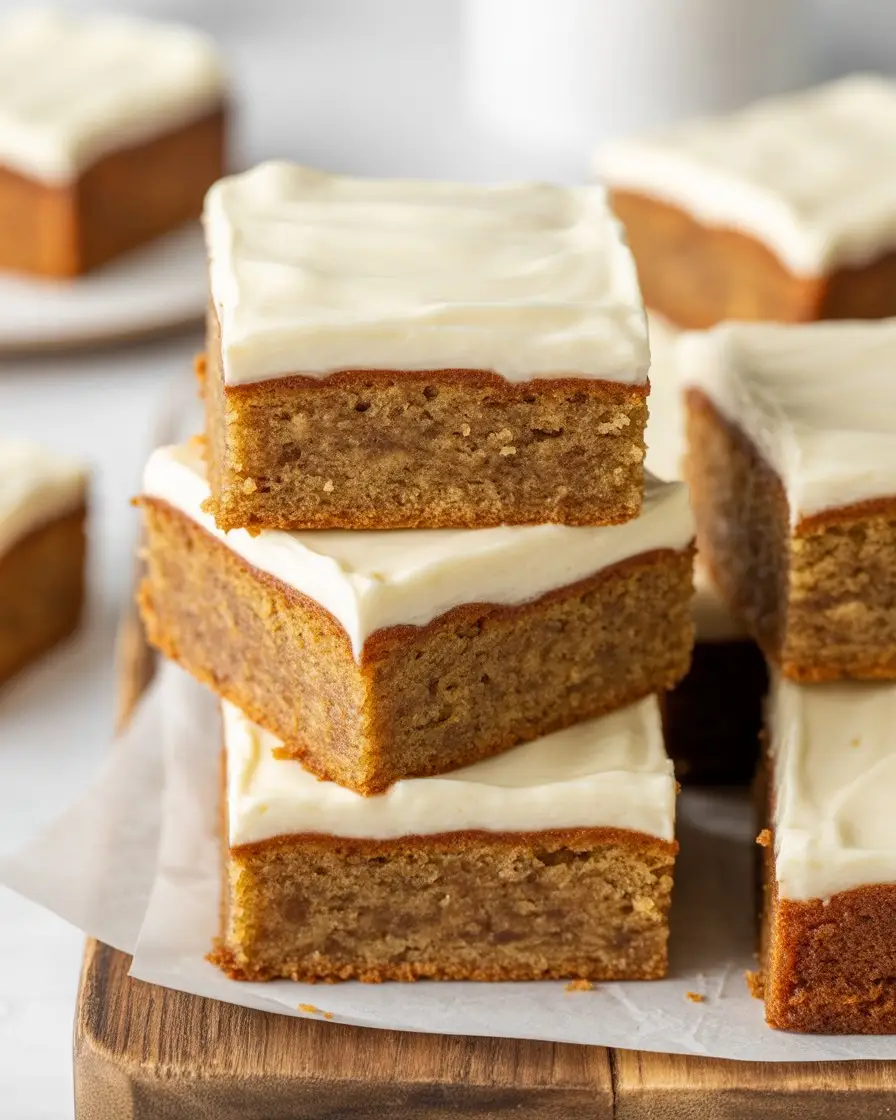
I’m talking about Banana Bread Bars. They’re soft, they’re moist, and we’re going to top them with a cream cheese frosting that is just out of this world.
This isn’t some super complicated, chef-level recipe. This is down-to-earth, use-what-you’ve-got, and feel-good-about-it baking. So let’s turn those sad bananas into a reason to celebrate.
What You’ll Need
First things first, let’s gather up our ingredients. I’ve split it into two parts, one for the bars and one for that glorious frosting.
For the Banana Bars:
- 1 1/2 cups all-purpose flour
- 1 teaspoon baking soda
- 1/2 teaspoon salt
- 1/2 teaspoon ground cinnamon
- 1/2 cup unsalted butter, melted
- 3/4 cup packed light brown sugar
- 2 large eggs, at room temperature
- 1 teaspoon vanilla extract
- 3 very ripe medium bananas, mashed up
For the Cream Cheese Frosting:
- 4 oz cream cheese, softened to room temperature
- 1/4 cup unsalted butter, softened to room temperature
- 2 cups powdered sugar
- 1/2 teaspoon vanilla extract
- 1-2 tablespoons milk or cream (if needed)
Tools of the Trade
You don’t need a professional kitchen for this. Just a few basic things will get the job done.
- 9×13 inch baking pan
- Parchment paper
- Two large mixing bowls
- A whisk
- A spatula
- An electric mixer (or a strong arm and a whisk for the frosting)
- Measuring cups and spoons
Pro Tips
I’ve made these bars more times than I can count, and I’ve learned a few things along the way. Here are some tips that’ll make a real difference.
1. Your Bananas Can’t Be Too Ripe. Seriously. The uglier, the better. Those deep brown, almost black bananas are packed with sugar and moisture. This is what gives the bars their incredible flavor and super soft texture. Yellow bananas just won’t cut it.
2. Don’t Overmix the Batter. When you combine the wet and dry ingredients, mix them just until you don’t see any more flour streaks. If you mix it too much, you’ll develop the gluten in the flour and end up with tough, dense bars instead of light, fluffy ones.
3. Room Temperature is Key for Frosting. Your butter and cream cheese MUST be soft. Not melted, but soft. If they’re cold, your frosting will be lumpy, and nobody wants lumpy frosting. If you forgot to take them out, you can cut the butter into small cubes and microwave it in 5-second bursts. For the cream cheese, just leave it in its foil wrapper and submerge it in a bowl of warm water for about 10 minutes.
4. Be Patient and Let It Cool. I know it’s tempting to frost the bars the second they come out of the oven. Don’t do it. If you try to spread frosting on a warm base, you’ll have a soupy, melted mess. Let the bars cool completely to room temperature first. Trust me on this one.
Substitutions and Variations
This recipe is pretty forgiving. You can swap things out or add things in based on what you have or what you’re in the mood for.
| Ingredient | Substitution | Notes |
|---|---|---|
| All-Purpose Flour | Whole Wheat Flour | Use half whole wheat, half all-purpose for a heartier texture. |
| Light Brown Sugar | Coconut Sugar or Maple Syrup | Reduces refined sugar; maple syrup might alter moisture. |
| Unsalted Butter | Coconut Oil or Applesauce | Coconut oil for a slight flavor change; applesauce for lower fat. |
| Eggs | Flax Eggs | For a vegan option, mix 1 tbsp ground flax with 3 tbsp water per egg. |
Fun Mix-Ins: Feel free to fold about a cup of chocolate chips, chopped walnuts, or pecans into the batter before baking. A swirl of peanut butter or Nutella on top before it goes in the oven is also amazing.
Make-Ahead Tips
You can absolutely prep this ahead of time to make life easier.
The banana bars can be baked, cooled completely, and stored in an airtight container at room temperature for up to two days before you frost them.
The cream cheese frosting can also be made ahead. Just keep it in an airtight container in the fridge for up to 3-4 days. Let it sit out for about 20-30 minutes to soften before you try to spread it.
How to Make Banana Bread Bars: Step-by-Step
Alright, let’s get to the fun part. Here’s how you bring it all together.
Making the Banana Bars
Step 1: Preheat your oven to 350°F (175°C). Grease a 9×13 inch pan and line it with parchment paper, leaving some overhang on the sides to act as handles. This will make it way easier to lift the bars out later.
Step 2: In a large bowl, whisk together the flour, baking soda, salt, and cinnamon. Just a quick mix to get everything combined. Set it aside.
Step 3: In another large bowl, combine the melted butter and brown sugar. Whisk them until they’re smooth. Add the eggs and vanilla extract and whisk again until everything is well incorporated.
Step 4: Now, add the mashed bananas to your wet ingredients and stir them in. It’s okay if it’s a little lumpy.
Step 5: Pour the wet ingredients into the dry ingredients. Use a spatula to gently fold everything together until it’s just combined. Remember that pro tip—do not overmix!
Step 6: Spread the batter evenly into your prepared pan. Bake for 20-25 minutes, or until a toothpick inserted into the center comes out clean. Let the bars cool completely in the pan.
Whipping Up the Cream Cheese Frosting
Step 1: While the bars are cooling, you can make the frosting. In a medium bowl, use an electric mixer to beat the softened cream cheese and softened butter together until they are smooth and creamy.
Step 2: Gradually add the powdered sugar, mixing on low speed at first so you don’t create a sugar cloud in your kitchen. Once it’s incorporated, add the vanilla.
Step 3: Turn the mixer up to medium-high and beat for 2-3 minutes until the frosting is light and fluffy. If it seems too thick, you can add a tablespoon of milk at a time until it reaches a nice, spreadable consistency.
Step 4: Once the bars are completely cool, spread the frosting evenly over the top. You can lift the bars out of the pan using the parchment paper handles to make this easier.
The Nitty Gritty: Nutrition, Pairings, and More
Let’s break down some of the other details you might be curious about.
| Quick Facts | |
|---|---|
| Best Paired With | A hot cup of coffee, a cold glass of milk, or tea. |
| Prep Time | 15 Minutes |
| Cook Time | 20-25 Minutes |
| Serving Size | Makes about 16 bars |
Nutritional Info: Please note, these values are just an estimate! They can change based on the specific ingredients you use. For one bar, you’re looking at roughly 250-300 calories.
Efficiency Tip: While the bars are baking, it’s the perfect time to make the frosting. You can also wash the bowls you used for the batter. Working in these small windows means less cleanup at the end.
Leftovers and Storage
If you somehow have leftovers, here’s how to handle them.
Because of the cream cheese frosting, you’ll need to store the bars in the refrigerator. Place them in an airtight container or cover the pan tightly with plastic wrap. They’ll stay fresh for up to 4 days.
These bars also freeze really well! You can freeze them with or without the frosting. Cut them into individual squares, then wrap each one in plastic wrap and place them in a freezer-safe bag. They’ll last for up to 3 months. Just let them thaw in the fridge or on the counter when you’re ready to eat.
Frequently Asked Questions
Q1. My bars came out a bit dry. What went wrong?
Ans: This is usually caused by one of two things: overbaking or overmixing the batter. Try reducing your bake time by a couple of minutes, and remember to only mix the batter until the flour just disappears.
Q2. My frosting is too runny! How can I fix it?
Ans: No problem. The easiest fix is to add more powdered sugar, a little bit at a time, until it thickens up. You can also try chilling it in the refrigerator for 20-30 minutes, which will help it firm up.
Q3. Can I use a different size pan?
Ans: You can, but you’ll need to adjust the baking time. A smaller pan like a 9×9 inch will result in thicker bars that need more time in the oven. A larger pan will create thinner bars that bake faster. Keep an eye on them and use the toothpick test.
Q4. Can I make these into muffins instead?
Ans: Absolutely. Just divide the batter into a lined muffin tin, filling each cup about 2/3 full. Bake at 350°F for about 18-22 minutes, or until a toothpick comes out clean. Then you can frost the tops once they’re cool.
Wrapping Up
And there you have it. A simple, no-fuss way to create something truly delicious from those bananas you almost gave up on.
This recipe is more of a guideline than a strict rule. Don’t be afraid to make it your own with different mix-ins or spices.
I really hope you give these bars a try. If you do, I’d love to hear about it! Leave a comment below and let me know how they turned out, or if you have any questions. Your feedback is always super helpful.