
“`html
The Only Banana Cake Recipe You’ll Ever Need (Seriously)
You know those bananas. The ones sitting on your counter, looking sadder by the day. They’ve gone from a cheerful yellow to a spotty, brown, and frankly, kind of depressing sight. You keep saying you’ll eat them, but their time has passed. For eating, anyway.
But that’s their secret power. Just when you think they’re destined for the trash, they’re actually at their peak performance for becoming the most amazing, moist, and flavorful banana cake you’ve ever had.
I used to be intimidated by baking. All the precise measurements and the fear of a flat, sad-looking cake. But this recipe is so forgiving, it practically makes itself. It’s my go-to for turning kitchen-counter-tragedy into a delicious victory.
So let’s rescue those bananas and turn them into something that will make your whole house smell incredible.
What You’ll Need
First things first, let’s gather our supplies. Don’t worry, there’s nothing too wild or hard to find here. It’s all pretty standard stuff you might already have hiding in your pantry.
- All-purpose flour: 2 cups
- Baking soda: 1 teaspoon
- Salt: 1/2 teaspoon
- Unsalted butter: 1/2 cup (1 stick), softened to room temperature
- Granulated sugar: 1 cup
- Eggs: 2 large, at room temperature
- Vanilla extract: 1 teaspoon
- Very ripe bananas: 3 to 4 large ones, mashed up
- Buttermilk or plain yogurt: 1/4 cup (also at room temperature)
The Tools for the Job
You don’t need a professional kitchen setup for this. Just a few basic tools will get the job done perfectly.
- A 9×13 inch baking pan (or two 8-inch round pans)
- A large mixing bowl
- A separate medium bowl
- A whisk
- An electric mixer (handheld or stand mixer works great)
- A spatula for scraping the bowl
- A fork for mashing the bananas
Pro Tips From My Kitchen
I’ve made this cake more times than I can count, and I’ve learned a few things along the way. These little tricks make a huge difference.
1. Use SUPER Ripe Bananas
I’m talking about bananas that are more brown than yellow. They might look gross, but the darker they are, the more sugar they contain. This means more natural sweetness and a much stronger, deeper banana flavor in your cake. Green or yellow bananas just won’t cut it.
2. Don’t You Dare Overmix
Once you add the flour, you need to mix it as little as possible. Mix just until you don’t see any more dry streaks. Overmixing develops the gluten in the flour, and while that’s great for chewy bread, it makes a cake tough and dense. We’re going for soft and tender here.
3. Room Temperature is Your Friend
Having your butter, eggs, and buttermilk at room temperature is a game-changer. Cold ingredients don’t mix together smoothly. Room temp ingredients combine to create a smooth, uniform batter that traps air, which results in a lighter, fluffier cake. It’s a small step that yields big results.
Step-by-Step Instructions
Alright, let’s get down to business. Follow these steps and you’ll be on your way to banana cake heaven.
Step 1: Preheat your oven to 350°F (175°C). Grease and flour your 9×13 inch pan so the cake doesn’t stick. Nobody wants to leave half the cake behind in the pan.
Step 2: In your medium bowl, whisk together the flour, baking soda, and salt. This helps distribute the leavening agent evenly so you don’t get a lopsided cake. Set this bowl aside for now.
Step 3: In the large bowl, use your electric mixer to beat the softened butter and granulated sugar together until the mixture is light and fluffy. This usually takes about 2-3 minutes. Scrape down the sides of the bowl with your spatula.
Step 4: Add the room temperature eggs, one at a time, beating well after each one. Then, mix in the vanilla extract.
Step 5: Now for the star of the show. Add the mashed bananas and the buttermilk (or yogurt) to the butter mixture. Mix on low speed until it’s just combined. The batter might look a little lumpy or curdled at this point. That’s totally normal, don’t panic.
Step 6: Pour the dry ingredients (the flour mixture) into the wet ingredients. Mix on the lowest speed possible, or even by hand with a spatula, just until the flour disappears. Remember what I said about not overmixing!
Step 7: Pour the batter into your prepared pan and use the spatula to spread it out evenly. Pop it in the preheated oven.
Step 8: Bake for 30-35 minutes. You’ll know it’s done when a toothpick inserted into the center comes out clean or with a few moist crumbs attached. Let the cake cool completely in the pan before you even think about slicing or frosting it.
Substitutions and Fun Variations
This recipe is a great base for getting creative. Here are some simple swaps and fun additions you can try.
Ingredient Swaps
Sometimes you don’t have exactly what a recipe calls for. No problem.
| Ingredient | Substitution | What to Expect |
|---|---|---|
| Unsalted Butter | Coconut Oil | A moist cake with a hint of coconut. |
| Granulated Sugar | Brown Sugar | A richer, moister cake with caramel notes. |
| Buttermilk | Sour Cream | An extra tangy and tender crumb. |
Awesome Variations
- Chocolate Chip Banana Cake: Fold in 1 cup of semi-sweet chocolate chips into the batter at the very end. Banana and chocolate are a classic pair for a reason.
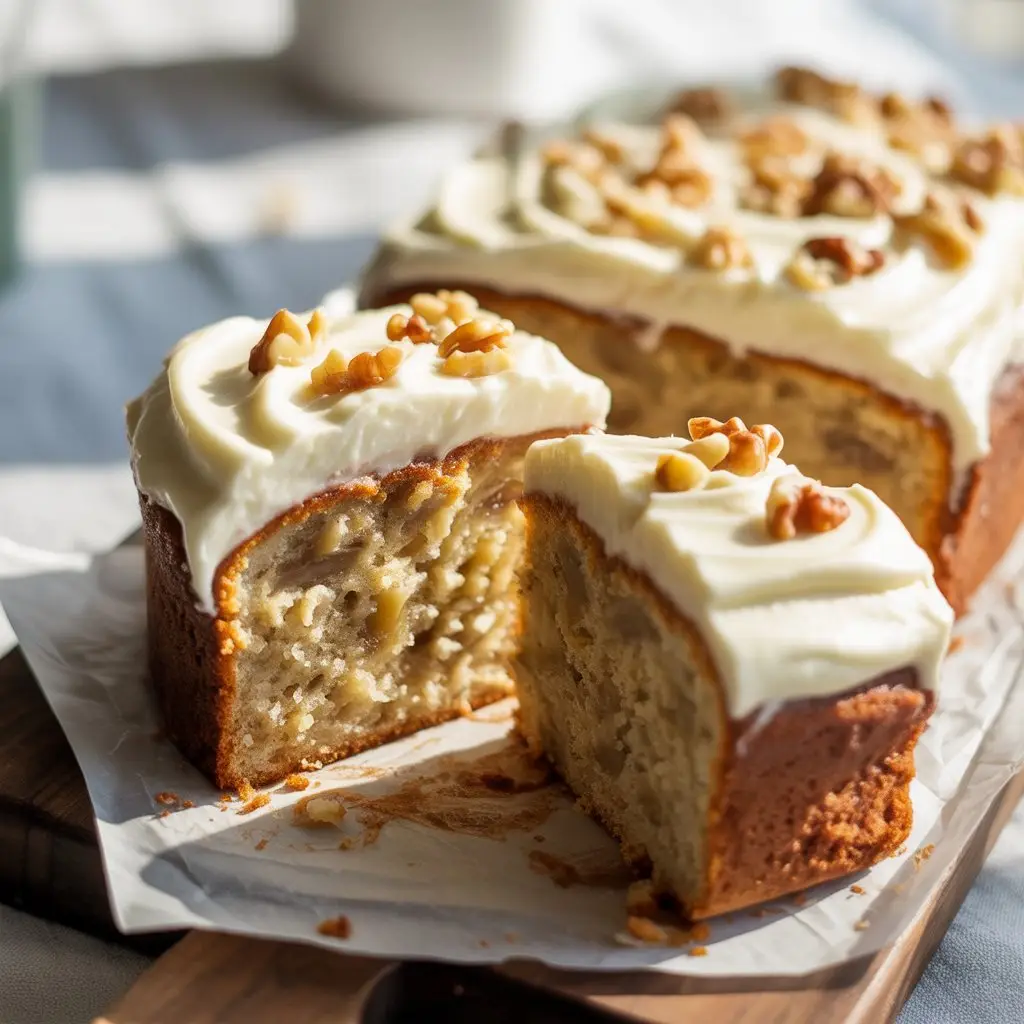
- Nutty Banana Cake: Add 3/4 cup of chopped walnuts or pecans to the batter. You can also sprinkle some on top before baking for a nice crunch.
- Spiced Banana Cake: Add 1 teaspoon of cinnamon and 1/4 teaspoon of nutmeg to your dry ingredients. It gives the cake a warm, cozy flavor that’s perfect for fall.
Nutritional Info, Diet Swaps, and More
Here’s a little more info for those who are curious about what’s inside or how to adapt the cake for different needs.
Estimated Nutrition
This is just a rough estimate per slice (if you cut the cake into 12 pieces). It’s cake, so let’s just enjoy it!
| Nutrient | Approximate Amount |
|---|---|
| Calories | 280 kcal |
| Fat | 12g |
| Carbohydrates | 40g |
| Protein | 4g |
Making it Fit Your Diet
You can tweak this recipe to fit different dietary requirements pretty easily.
- For a Gluten-Free Cake: Swap the all-purpose flour with a good quality 1-to-1 gluten-free baking flour blend. The texture might be slightly different, but it will still be delicious.
- For a Dairy-Free Cake: Use a plant-based butter substitute instead of regular butter, and use a dairy-free yogurt or a plant-based milk mixed with a teaspoon of vinegar in place of the buttermilk.
Serving Suggestions
This cake is fantastic all on its own, maybe with a cup of coffee for breakfast (I won’t tell). But if you want to dress it up, a simple cream cheese frosting is the absolute best. You can also just dust it with a little powdered sugar or serve a warm slice with a scoop of vanilla ice cream.
Leftovers and Storage
If you somehow have leftovers, here’s how to keep them fresh.
You can store the cake in an airtight container at room temperature for up to 3 days. The flavor actually gets even better on the second day.
If you want it to last longer, you can store it in the fridge for up to a week. To freeze it, wrap individual slices tightly in plastic wrap and then aluminum foil. They’ll keep in the freezer for up to 3 months. Just let a slice thaw on the counter for an hour or so when you’re ready for a treat.
Frequently Asked Questions
Here are some common questions that might pop up while you’re baking.
Q1. Why did my cake sink in the middle?
Ans: This usually happens for two reasons: opening the oven door too early, which causes a sudden temperature drop, or underbaking. Make sure to use the toothpick test to confirm it’s cooked all the way through before taking it out.
Q2. Can I use frozen bananas?
Ans: Absolutely! Frozen bananas are perfect for baking. Just let them thaw completely on the counter. They will release a lot of liquid—be sure to drain that extra liquid off before you mash them and add them to the batter.
Q3. My cake seems dry. What did I do wrong?
Ans: The most common culprits for a dry cake are overbaking or measuring the flour incorrectly. Make sure to set a timer and check for doneness. When measuring flour, scoop it into your measuring cup with a spoon and then level it off, rather than scooping directly from the bag, which can pack too much flour in.
Q4. Can I make these as muffins instead?
Ans: Yes! This recipe works great for muffins. Just line a muffin tin with paper liners, fill them about two-thirds full, and bake for 18-22 minutes, or until a toothpick comes out clean. You should get about 18 muffins.
Wrapping Up
And there you have it. A simple, no-fuss way to turn those sad, overripe bananas into an incredibly delicious cake. It’s proof that sometimes the best things come from ingredients you almost gave up on.
This recipe is meant to be a starting point. Feel free to make it your own by adding nuts, chocolate, or spices. Baking should be fun, not stressful.
So go ahead, give it a try. I’d love to hear how it turns out for you. Let me know in the comments if you made it, or if you have your own special twist on banana cake!
“`