
The Only Dutch Apple Pie Recipe You’ll Ever Need (Seriously)
Okay, let’s just get this out of the way. Some days you just need a hug in the form of food. For me, that’s almost always a warm slice of apple pie.
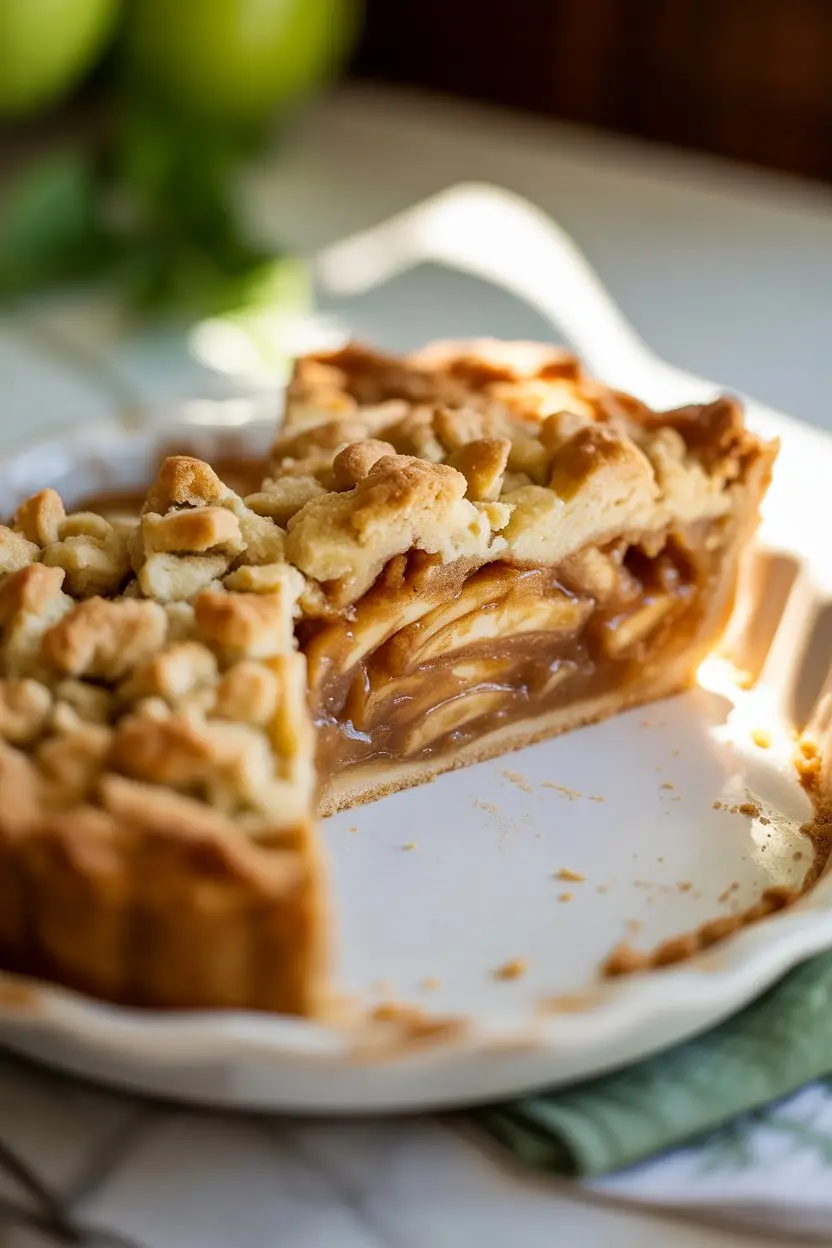
Not just any apple pie, though. It has to be a Dutch apple pie, with that incredible, buttery, crumbly streusel topping that basically changes your life.
I know, making a pie from scratch sounds like a HUGE project. It can feel a little scary, like you need to be some perfect baker with a spotless kitchen. But I promise you, that’s not the case at all.
In fact, messing up is part of the fun. A little lopsided? Who cares. A crack in the crust? That’s just character. This recipe is all about making something that feels good and tastes even better. You. Can. Do. This.
So, let’s roll up our sleeves and make something amazing. Because what feels better than the smell of cinnamon and apples baking in your own oven? Not a whole lot, that’s what.
What You’ll Need
First things first, let’s get our ingredients in order. I’ve split this up into the three main parts: the crust, the filling, and that glorious topping.
For the Pie Crust (The Foundation!)
- 1 1/4 cups all-purpose flour
- 1/2 teaspoon salt
- 1/2 cup (1 stick) very cold unsalted butter, cut into small cubes
- 4 to 6 tablespoons ice cold water
For the Apple Filling (The Heart and Soul)
- 6 to 7 medium apples (a mix of Granny Smith and Honeycrisp is my favorite)
- 3/4 cup granulated sugar
- 1/4 cup all-purpose flour
- 1 teaspoon ground cinnamon
- 1/4 teaspoon ground nutmeg
- 1 tablespoon lemon juice
For the Crumb Topping (The Crown Jewel)
- 1 cup all-purpose flour
- 1/2 cup packed light brown sugar
- 1/4 cup granulated sugar
- 1/2 teaspoon ground cinnamon
- 1/2 cup (1 stick) cold unsalted butter, cut into small cubes
Pro Tips
Over the years, I’ve made a LOT of pies. Some were great, some were… learning experiences. Here are a few things I’ve picked up that really help.
- Cold is Key: Your butter for the crust and topping needs to be COLD. Like, straight from the fridge cold. This is what creates those flaky layers and a crumbly, not greasy, topping. If your kitchen is warm, you can even pop the flour in the freezer for 15 minutes.
- Mix Your Apples: Don’t just use one type of apple. Using a firm, tart apple like Granny Smith with a sweeter, softer apple like Honeycrisp or Gala gives you the best of both worlds. You get structure and a much more interesting flavor.
- Don’t Fear the Dark: Don’t be afraid to let your pie bake until the topping is a deep golden brown. A pale pie is often a soggy pie. That color means flavor. If the edges are browning too fast, just make a little foil shield to cover them.
- Let It Rest: This is the hardest part. You HAVE to let the pie cool for at least 3-4 hours before you slice it. I know, it’s torture. But if you cut it while it’s hot, the filling will just spill out everywhere. Patience is your friend here.
Tools Required
You don’t need a bunch of fancy gadgets. Here’s the basic stuff.
- 9-inch pie dish
- Large mixing bowl (a few, actually)
- Pastry blender or two knives (or your fingers!)
- Rolling pin
- Measuring cups and spoons
- Peeler and a knife or an apple corer/slicer
Substitutions and Variations
Don’t have something on hand? No problem. Baking is flexible.
| Ingredient | Substitution Idea | Note |
|---|---|---|
| Pie Crust | Store-Bought Crust | A huge time-saver! |
| All-Purpose Flour | Gluten-Free 1-to-1 Blend | Make sure it has xanthan gum. |
| Unsalted Butter | Vegan Butter Sticks | Keep it very cold. |
| Spices | Cardamom or Ginger | Add 1/4 tsp for extra warmth. |
| Crumb Topping | Add 1/2 cup Rolled Oats | Gives it a chewier texture. |
Make-Ahead Tips
You can totally break this up to make it less overwhelming.
The pie dough can be made up to 2 days in advance. Just wrap it tightly in plastic wrap and keep it in the fridge. You can also freeze it for up to 3 months.
The crumb topping can also be mixed together and stored in an airtight container in the fridge for up to 3 days. It keeps the butter nice and cold until you’re ready to use it.
How to Make This Dutch Apple Pie
Alright, let’s get to it. We’ll do this in a few parts.
Part 1: The Crust
Step 1: In a big bowl, whisk together the 1 1/4 cups flour and the salt. Easy enough.
Step 2: Add the cold, cubed butter. Use a pastry blender or your fingertips to cut the butter into the flour until it looks like coarse crumbs with some pea-sized bits of butter still visible.
Step 3: Sprinkle in the ice water, one tablespoon at a time, mixing gently with a fork until the dough just starts to come together. Don’t add too much water!
Step 4: Form the dough into a disk, wrap it in plastic wrap, and chill it in the fridge for at least 1 hour. This is super important.
Part 2: The Filling & Topping
Step 5: While the dough chills, let’s make the filling. Peel, core, and slice your apples into about 1/4-inch thick slices. Put them in a large bowl.
Step 6: Add the 3/4 cup sugar, 1/4 cup flour, cinnamon, nutmeg, and lemon juice to the apples. Toss everything together until the apples are evenly coated.
Step 7: Now for the topping! In a separate bowl, combine the 1 cup flour, brown sugar, granulated sugar, and cinnamon. Add the cold butter cubes and, just like with the crust, cut it in until you have a crumbly mixture. Then pop this bowl in the fridge.
Part 3: Assembly & Baking
Step 8: Preheat your oven to 400°F (200°C). Take your chilled dough out of the fridge.
Step 9: On a lightly floured surface, roll the dough out into a circle about 12 inches wide. Carefully transfer it to your 9-inch pie dish. Trim and crimp the edges however you like.
Step 10: Spoon the apple filling into the unbaked pie shell. Pack it in there!
Step 11: Grab your cold crumb topping from the fridge and sprinkle it evenly all over the apples. Be generous.
Step 12: Place the pie on a baking sheet (to catch any drips) and bake for 15 minutes at 400°F. Then, reduce the oven temperature to 375°F (190°C) and bake for another 35-45 minutes.
Step 13: The pie is done when the topping is a deep golden brown and the filling is bubbly. Let it cool on a wire rack for at least 3-4 hours before slicing.
The Nitty Gritty Details
Here’s a little more info that might be helpful.
| Category | Information |
|---|---|
| Nutrition (Estimate) | Around 450-500 calories per slice. It’s a treat! |
| Meal Pairing | Vanilla bean ice cream is a must. A cup of black coffee works great too. |
| Efficiency Tip | Make the crust and topping a day ahead to save time. |
| Dietary Swaps | Use vegan butter and a GF flour blend to adapt it. |
Leftovers and Storage
If you somehow have leftovers, here’s what to do.
You can store the pie, loosely covered, at room temperature for up to 2 days. The crumb topping helps keep it fresh.
After that, it’s best to move it to the fridge, where it will last for another 2-3 days.
To reheat, pop a slice in the oven at 350°F (175°C) for about 10-15 minutes. It makes the topping crispy again. The microwave works in a pinch, but it can make the crust a little soft.
Frequently Asked Questions
Q1. Why is my pie filling watery?
Ans: This usually happens for a couple of reasons. You might have used apples that release a lot of water, or the pie might just need a little more time in the oven for the flour to thicken the juices. Make sure you see it bubbling before you take it out!
Q2. Can I use a pre-made pie crust?
Ans: Absolutely! Life is busy. A good quality store-bought crust is a fantastic shortcut. No shame in that game at all. Just follow the package directions for pre-baking if needed, then fill and top as described.
Q3. My crumb topping melted into a solid layer instead of staying crumbly. What happened?
Ans: Ah, the classic topping issue. This almost always means the butter was too soft when you mixed it, or you overmixed it into a paste. Keep that butter cold and mix just until it’s crumbly.
Q4. How do I know for sure when my pie is done?
Ans: Look for two key signs. The topping should be a nice, deep golden brown. And more importantly, you should see the filling bubbling up thickly around the edges of the pie. That’s how you know the inside is hot enough and the thickeners have activated.
Wrapping Up
So there you have it. It might seem like a lot of steps, but each one is simple. Just take it one step at a time.
There is something so incredibly satisfying about pulling a beautiful, homemade pie out of your own oven. It’s more than just dessert; it’s a project you can be proud of.
So please, give it a try. Don’t worry about making it perfect. Just have fun with it. And when you do make it, I’d honestly love to hear about it. Drop a comment below and let me know how it went, or if you have any questions at all!