
Because You Deserve a Treat That Looks Fancy but Is Stupid Easy
Alright, I know why you’re here. You want something that’s crazy simple, looks like a Pinterest masterpiece, and tastes like your inner child and your grown-up sweet tooth just shook hands. Ice cream sandwich dessert. It’s the kind of thing you bring to a potluck and everyone suddenly treats you like a culinary genius.
But here’s the truth: it’s barely even cooking. Like, if you can unwrap a sandwich, pour stuff on top, and throw something in the freezer… you’re already qualified. No judgment. No mixer. No double boiler. No stress.
And honestly, after one bite of this thing, you won’t even care that it took you ten minutes. You’ll be too busy planning when to make it again. (Or hide it from your family. I don’t judge.)
Let’s get into this dangerously easy dessert that has no business tasting this good.
What You’ll Need
- About 12 ice cream sandwiches (standard size, any brand)
- 1 container whipped topping (like Cool Whip, thawed)
- 1 jar chocolate sauce or hot fudge (pick your favorite)
- 1 jar caramel sauce (because we’re doing this right)
- Crushed Heath bars or toffee bits (or whatever candy makes your heart sing)
That’s it. That’s the whole vibe. Five things. Minimal thinking. Maximum sugar rush.
Tools You’ll Want to Have Nearby
- 9×13-inch baking dish (or whatever fits your vibe and your freezer)
- Spatula or butter knife (not fancy, just efficient)
- Freezer-safe cover, plastic wrap, or foil (you’re gonna need to cover it)
- Microwave-safe bowl or measuring cup (for sauce warming)
- Optional: sharp knife dipped in hot water (for that clean slice if you’re trying to impress someone)
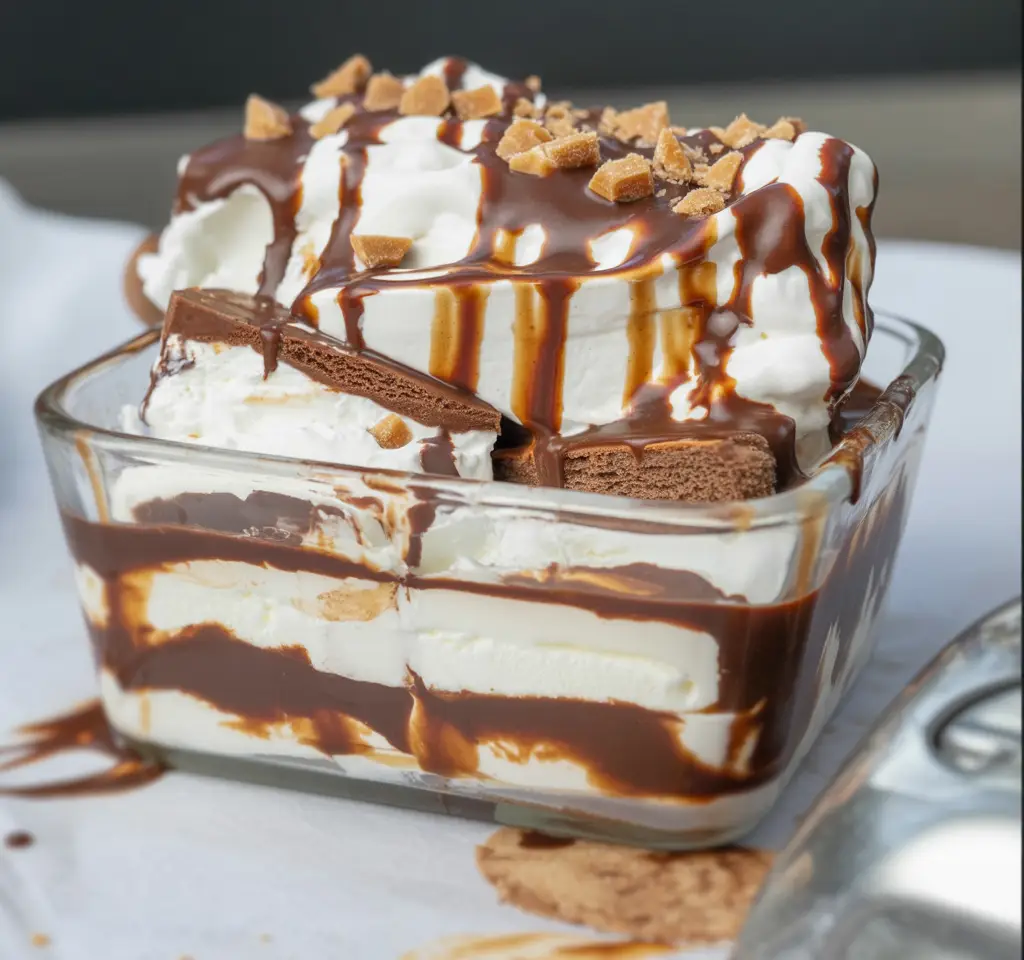
Let’s Talk Layers (a.k.a. What You’re Actually Doing)
- Start by unwrapping your ice cream sandwiches. Line them up in a single layer on the bottom of your baking dish. You might need to cut or squish one to fit the edge, and that’s totally fine. This is a flexible dessert.
- Drizzle a good layer of chocolate sauce over the sandwiches. Not a polite drizzle—be generous.
- Add a second layer of sandwiches directly on top. Stack them. Sandwich on sandwich. It’s happening.
- Pour caramel sauce over this layer like you mean it. Make it messy. It’s dessert.
- Spread your thawed whipped topping all over the top. Try not to lick the spatula until you’re done (or don’t, I’m not your mom).
- Sprinkle the crushed Heath bars (or your candy of choice) all over the top. It’s the sparkle moment.
- Cover it up and stick the whole pan in the freezer. Give it a good four hours minimum, but overnight is ideal. You want it solid.
Pro Tips You’ll Wish You Knew Sooner
1. Warm the sauces a little. Just enough to make them pourable. Like 10 seconds in the microwave. You don’t want to melt the sandwiches—you just want flow.
2. Pre-unwrap your sandwiches. Do all of them at once so you’re not fumbling with frozen wrappers mid-assembly.
3. Press gently when stacking. A light squish helps the layers settle without ice cream shooting out the sides.
4. Freeze with foil or wrap touching the whipped topping. This keeps it from getting that weird freezer film on top. Optional but helpful.
5. Want clean cuts? Dip a sharp knife in hot water before slicing. Wipe between cuts. Looks pro. Feels satisfying.
Substitutions & Variations (a.k.a. Ways to Play With Your Food)
- No Heath bits? Use crushed Oreos, chopped Snickers, sprinkles, or even pretzels for that sweet-salty combo.
- Need a dairy-free version? Grab dairy-free ice cream sandwiches, use coconut whipped topping, and skip or sub in dairy-free sauces. Still indulgent. Still amazing.
- Add layers of personality. Toss in a thin layer of peanut butter between sandwich layers. Or Nutella. Or crushed graham crackers. You get it.
- Flavor twist? Use mint chocolate chip or cookies and cream sandwiches. Suddenly, you’ve got a themed dessert without doing anything extra.
- Want it extra bougie? Top with fresh raspberries or drizzle with espresso for an adult spin.
Make-Ahead Tips (Because Future You Deserves a Break)
- You can assemble this dessert up to 2 days in advance. Just be sure it’s wrapped up tight.
- Don’t add fresh fruit or crunchy toppings until the day you’re serving it—unless you like them soggy, which… respect.
- This is the ideal “prep and forget” kind of treat. Set it. Freeze it. Brag about it later.
Storage & Leftover Tips (Assuming You Have Leftovers)
- Freezer life: Covered, this will last 5 to 7 days without losing flavor. After that, it’s still edible, but texture might get weird.
- Individual slices: Wrap leftovers in parchment and freeze them as single servings. That way, you’re one impulse away from dessert any day of the week.
- Softening tip: Let it sit out for 5–10 minutes before slicing again. It’ll be softer and creamier—worth the wait.
Bonus Section: Nutrition & Pairing Ideas (Just In Case You’re Curious)
Let’s be real—this is a dessert. But if you’re watching things, here’s the estimate per serving (based on a 12-slice portion):
- Calories: ~280–320
- Sugar: Let’s not talk about it, but it’s there.
- Protein: 2–4g
- Joy: 10/10
Serving ideas:
- Serve with fresh strawberries or banana slices for a “balanced” dessert.
- Coffee pairs beautifully with the chocolate + caramel.
- Want a holiday spin? Add crushed candy canes on top. Instant Christmas.
Speed tip: This takes 10 minutes to assemble and not much cleanup. Honestly, it might take longer to unwrap the sandwiches than to put the thing together.
FAQ – Let’s Clear Up a Few Things
Q: Can I use homemade ice cream sandwiches? Sure, but let’s be honest—you’re here because you don’t want to do that. Store-bought is perfect. But if you’re feeling fancy, go wild.
Q: What’s the best way to cut this without it falling apart? Hot knife. Clean between cuts. Patience. Or don’t care and just serve rustic chunks. People will still devour it.
Q: Can I make it in a smaller dish? Absolutely. Halve the recipe for an 8×8 dish and just layer accordingly. No rules.
Q: Can I make it low sugar or “healthier”? You can try. Use sugar-free sauces, low-calorie whipped topping, or protein-packed ice cream sandwiches. It won’t taste the same, but you’ll feel better about your life choices.
Q: Will my kids eat this? Do they have taste buds? Then yes.
Wrap Up
This is one of those recipes that’s so simple, it’s almost suspicious. Like… how is this so good when I barely did anything? And that’s exactly the magic of it.
Whether you’re making this for a summer BBQ, a birthday party, a family movie night, or just because Tuesday was a lot, this ice cream sandwich dessert is your new secret weapon.
Try it once. You’ll be hooked. And when you do? Come back here and tell me how it went. Did you use peanut butter cups? Did your kids scream with joy? Did you end up hiding the last slice in the back of the freezer behind the frozen peas?
I wanna know.
Drop your experience, your tweaks, your tips—or your questions—in the comments. I love hearing how these recipes play out in real kitchens with real people.
Go get your freezer ready. You’ve got some layering to do.