

You ever have a moment where you’re just sitting on the couch, and all you can think about is how nice it would be to have an ice cream cake in your freezer?
Like not a store-bought one that tastes like it’s been living in a cardboard box for the last six months.
But a real one. The kind where you get to pick every single flavor. Add all the crunchy stuff you love. And when you take that first bite, you kinda just close your eyes for a second and think, “Yep, this was a good life decision.”
Well, if that sounds like something you want, then this little recipe is for you.
It’s surprisingly simple. No oven, no baking, no standing mixer with 47 attachments. Just you, some ice cream, and a couple of layers that are going to change your whole dessert game.
So whether you’re making this for a birthday, a random Tuesday, or just because life feels a little more fun with ice cream cake — I got you.
Let’s do this.
What You’ll Need
Alright, first let’s talk ingredients. Here’s what you’ll want to grab:
- 2–3 pints of ice cream (any flavors you love — mix and match if you want)
- 1½ cups crushed cookies or brownies (Oreos, chocolate wafers, cookie dough bites… go wild)
- ½ to 1 cup of hot fudge or chocolate shell topping (store-bought works great, or use homemade)
- 1 cup heavy cream
- 2 tablespoons sugar
- 1 teaspoon vanilla extract
- Optional toppings: sprinkles, chopped nuts, chopped candy bars, berries — whatever makes your soul happy
Try not to eat everything while you’re prepping. (Or do. You’re the boss here.)
Let’s Talk Tools
Nothing fancy here, just the basics:
- Springform pan (8 or 9 inches works great)
- Plastic wrap
- Spatula
- A couple of mixing bowls
- Whisk or hand mixer
- Measuring cups and spoons
You can also use a loaf pan if that’s what you have on hand. Just line it really well so you can lift the whole thing out when it’s frozen.
Before You Start: Pro Tips From Someone Who Has Messed This Up So You Don’t Have To
- Let your ice cream soften — just a little. You want it spreadable, not soupy. If it’s melting all over your counter, it’s going to make things messy and hard to work with.
- Freeze between layers. Don’t rush this. Add a layer, pop it in the freezer for 30 minutes. Repeat. It helps everything set nicely and gives you those picture-perfect slices.
- Use a hot knife for slicing. Just run your knife under hot water for a few seconds, wipe it off, and slice. It’ll go through like butter.
- Mix cookies with a little melted butter. Not a must, but it keeps the layer from getting soggy and helps everything hold together when frozen.
- Line your pan like your life depends on it. Ok not your life, but your cake. Line the bottom and sides with plastic wrap so you can easily lift it out when you’re done. Trust me, you’ll thank yourself later.
Substitutions & Variations
Now the fun part: making this your own.
- Dairy-free? Use non-dairy ice cream and coconut whipped cream. Super easy swap.
- Gluten-free? Use gluten-free cookies, or even crushed almonds or walnuts for the crunchy layer.
- Want a layer of cake in there? You totally can! A thin slice of pound cake or brownies right in the middle takes this from great to whoa.
- Flavor ideas: Cookies and cream + mint chip. Strawberry + vanilla. Chocolate + peanut butter. Coffee + fudge brownie. Just don’t blame me if you want to try three versions back-to-back.
Can You Make It Ahead?
YES.
That’s actually the whole point. This is a freezer dessert — and that means it’s the kind of thing you can make way ahead and just pull out when needed.
I usually make mine the night before I need it. But you can make it up to 5–7 days in advance. Just keep it tightly wrapped so it doesn’t absorb any weird freezer smells (you know the ones).
Hold off on adding delicate toppings (like berries or whipped cream) until the day you serve it. Everything else? Go ahead and layer it up.
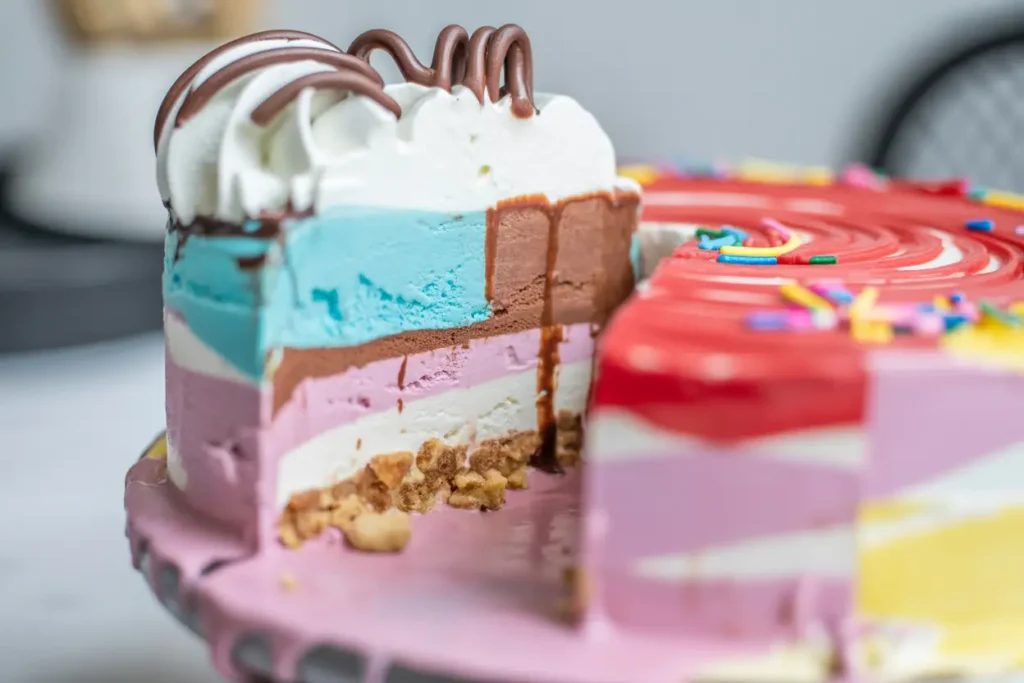
Step-by-Step Instructions
Let’s get into it:
1. Prep Your Pan
Line your springform pan with plastic wrap. You want it hanging over the edges a bit so you can lift the cake out later. If you’re using a loaf pan, do the same — press the wrap down snugly.
2. First Ice Cream Layer
Let your first pint of ice cream soften just a bit (about 10–15 minutes on the counter), then scoop it into the pan and spread it evenly with a spatula. Press it down so there are no gaps. Freeze for 30 minutes.
3. Crunch Layer
Crush your cookies or brownies. You can do this with a rolling pin in a zip-top bag, or just break them up with your hands — rustic is fine. Mix with a couple of tablespoons of melted butter if you want a more solid crunch.
Sprinkle this over the frozen ice cream layer. Drizzle on some fudge if you’re feeling fancy. Freeze again for 30 minutes.
4. Second Ice Cream Layer
Grab your second flavor, let it soften, and spread it right over the cookie layer. Press it down gently. Try to get a smooth surface. Freeze for at least 1 hour. (Longer if you want super clean layers.)
5. Make the Whipped Cream
In a bowl, whip your heavy cream, sugar, and vanilla together until you get nice, fluffy peaks. This is your “frosting.” You can also use store-bought whipped topping if you’re in a hurry, but homemade just tastes better.
6. Decorate
Spread the whipped cream over the top and sides (or just the top, your call). Add sprinkles, nuts, candy — go for it. This is where you can really make it your own.
7. Final Freeze
Cover the whole cake and freeze one last time — ideally for 4 hours or overnight. When you’re ready to serve, let it sit at room temp for about 5–10 minutes, then use that hot knife trick to slice cleanly.
Bonus Details
Nutrition (per slice, based on 12 slices): Roughly 400–500 calories, depending on your ingredients. About 20–25g of fat, 40g carbs, and a little bit of protein.
Meal Pairing Ideas: Serve it with some hot espresso or coffee, or a few fresh berries on the side to balance the sweetness. Honestly though, it holds its own.
Make It Lighter: Use frozen yogurt or banana-based ice cream alternatives. You can also swap whipped cream for Greek yogurt sweetened with a little maple syrup.
Time Saving Tip: Soften your ice cream while you prep the pan and toppings. That way you’re not just standing there waiting for it to melt like a sad dessert zombie.
What About Leftovers?
If you somehow don’t finish the whole thing (which, honestly, impressive), here’s how to store it:
- Keep it in an airtight container in the freezer.
- Or just wrap the whole thing tightly in plastic and foil.
- It’ll stay fresh for about 2–3 months.
- For individual slices, cut ahead of time, wrap them up, and freeze. Great for grab-and-go dessert cravings.
FAQ
Can I use a different type of pan? Yes! A loaf pan works great. Just make sure you line it well.
Do I really have to freeze between layers? Short answer: Yes. Long answer: If you don’t, everything turns into a melty swirl. Which can be fun, but not what we’re going for here.
Can I make this without whipped cream? Totally. You can top it with extra fudge, cookie crumbles, or just leave it bare. It’s still delicious.
Does it travel well? It does… if you keep it on ice. Bring a cooler with ice packs if you’re transporting it. And don’t leave it out too long before serving.
Wrap Up
You just made an ice cream cake. From scratch. With your own two hands. That’s pretty awesome.
And now that you know how easy it is, the real question is: what flavor combo are you trying next?
Is it a cookies & cream explosion? A strawberry shortcake remix? Something chocolatey and dramatic?
Let me know in the comments. I’d seriously love to hear how it turned out and if you added your own twist.
And if you’ve got any questions — from troubleshooting to flavor ideas — just ask. I’m here to help.
Because dessert shouldn’t be stressful.
It should be fun. And maybe just a little bit over the top.
Happy cake making.