
The Absolute Best Homemade Funfetti Cake (Promise It’s Easy)
I have this super vivid memory of my 8th birthday. All I wanted was one of those Funfetti cakes from a box. You know the one. The pure, rainbow-sprinkled joy.
That cake was everything. But I always thought making one from scratch would be this huge, complicated thing. A full-day kitchen project. I was wrong.
Turns out, making a Funfetti cake that tastes a million times better than the box is not only possible, it’s actually pretty simple. It’s so soft, moist, and packed with that vanilla flavor you’re craving.
So, let’s get you set up to make a cake that will honestly blow your mind. And everyone else’s. Get ready for the compliments.
What You’ll Need
First up, let’s get your ingredients in order. Don’t worry, it’s mostly stuff you might already have.
For the Cake:
- All-purpose flour
- Granulated sugar
- Baking powder
- Salt (just a pinch, it makes a difference!)
- Unsalted butter, softened to room temperature. Seriously, let it sit out for an hour.
- Whole milk
- Large eggs
- Clear vanilla extract (this gives you that classic “birthday cake” flavor)
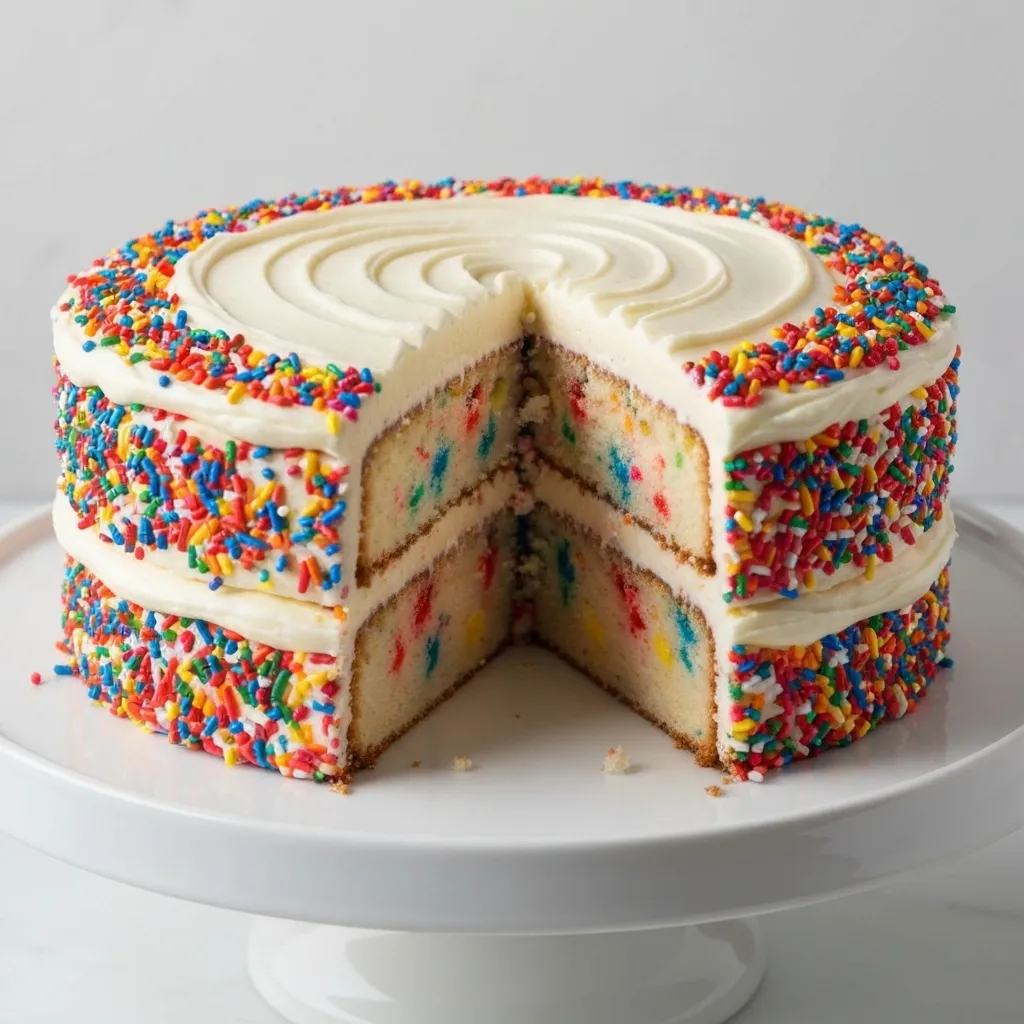
- And of course, Rainbow Jimmies! These are the long, skinny sprinkles. The little ball ones (nonpareils) will bleed their color everywhere.
For the Vanilla Buttercream:
- Unsalted butter, again, make sure it’s softened.
- Powdered sugar
- Heavy cream or whole milk
- Vanilla extract
- A tiny bit of salt
- More rainbow sprinkles for decorating!
Tools To Get The Job Done
You don’t need a professional kitchen, just a few key items.
- Two 8-inch or 9-inch round cake pans
- Parchment paper
- Electric mixer (a stand mixer or a hand mixer both work great)
- Mixing bowls
- Rubber spatula
- Wire cooling rack
- Offset spatula for frosting (makes you feel like a pro)
How To Make This Magical Cake
Alright, time for the fun part. Just follow along, and you’ll be golden.
Making the Cake Batter
Step 1: First things first, preheat your oven to 350°F (175°C). Take your cake pans, grease them with butter or baking spray, and line the bottoms with circles of parchment paper. This little step is a GAME CHANGER for getting your cakes out perfectly.
Step 2: In a large bowl (or the bowl of your stand mixer), whisk together the flour, sugar, baking powder, and salt. Just give it a quick mix to combine everything.
Step 3: Add your softened butter to the dry ingredients. Mix on low speed until the mixture looks like coarse, damp sand. This method is called reverse creaming, and it’s the secret to a super tender cake.
Step 4: In a separate bowl, whisk together the milk, eggs, and vanilla extract.
Step 5: Pour about half of this wet mixture into the flour-butter mixture. Mix on medium speed for about a minute until it’s combined and smooth. Scrape down the sides of the bowl with your spatula.
Step 6: Add the rest of the wet ingredients and mix for another 30 seconds. That’s it! Do NOT overmix, or you’ll get a tough cake. We don’t want that.
Step 7: Now for the best part. Gently fold in your rainbow jimmies with a spatula. Just a few turns until they’re mixed in. If you’re too aggressive, they might break and streak.
Step 8: Divide the batter evenly between your two prepared pans and smooth the tops. Pop them in the preheated oven and bake for 30-35 minutes. You’ll know they’re done when a toothpick inserted into the center comes out clean.
Step 9: Let the cakes cool in the pans on a wire rack for about 15 minutes. Then, carefully flip them out onto the rack, peel off the parchment paper, and let them cool completely. And I mean COMPLETELY. Frosting a warm cake is a recipe for a melty disaster.
Whipping Up the Buttercream
Step 1: While the cakes are cooling, make the frosting. In your large bowl, beat the softened butter with your electric mixer on medium-high speed for about 2-3 minutes until it’s super light and fluffy.
Step 2: Turn the mixer down to low and gradually add the powdered sugar, about one cup at a time. Once it’s all in there, add the vanilla and salt.
Step 3: Pour in 2 tablespoons of the heavy cream or milk and beat on medium-high speed for another 2-3 minutes. If it’s too stiff, add another tablespoon of cream until you get a nice, smooth, spreadable consistency.
Putting It All Together
Step 1: Place one of your completely cooled cake layers on a plate or cake stand. Spread a generous layer of buttercream on top, right to the edges.
Step 2: Place the second cake layer on top. Now, apply a thin layer of frosting all over the top and sides. This is called a “crumb coat” and it traps all the loose crumbs. Chill the cake in the fridge for 20-30 minutes to set it.
Step 3: Once it’s chilled, cover the whole cake with the rest of your beautiful buttercream. Use your offset spatula to get it as smooth (or as swirly) as you like.
Step 4: Before the frosting sets, go wild with the extra sprinkles! You can press them into the sides or just shower them over the top. There’s no wrong way to do it.
Pro Tips From My Kitchen
I’ve made a few… mistakes. Learn from them so you don’t have to!
- Room Temperature Is Key: I know I mentioned it, but I’m saying it again. Cold eggs and milk don’t mix well with the butter, and you can get a lumpy batter. Let everything sit on the counter for at least 30-60 minutes. It makes a HUGE difference in the texture.
- Don’t Fear the Salt: A little salt in your frosting seems weird, but trust me. It cuts the sweetness just enough and makes the vanilla flavor pop. It balances everything perfectly.
- The Gentle Fold: When you add the sprinkles, use a spatula and fold them in with just a few big scoops from bottom to top. The more you stir, the more their colors will bleed into your nice white batter. We want distinct dots of color!
Substitutions and Variations
What if you don’t have something? No problem.
| Ingredient | Substitution | Notes |
|---|---|---|
| Whole Milk | Buttermilk | Adds extra tang and tenderness. |
| All-Purpose Flour | 1-to-1 Gluten-Free Flour | Use a blend with xanthan gum. |
| Two 8-inch Pans | One 9×13 inch Pan | Bake for 35-40 min. |
| Round Cake | Cupcakes | Bake for 18-22 min. |
Make-Ahead & Efficiency Tips
You can totally break this up to make it less overwhelming.
The cake layers can be baked a day ahead. Once they’re completely cool, wrap them tightly in plastic wrap and keep them at room temperature. They’ll be perfect for frosting the next day.
The buttercream can also be made up to 3 days in advance. Just store it in an airtight container in the fridge. Let it come to room temperature and give it a good whip with your mixer to make it fluffy again before you use it.
Nutritional Info & Serving Ideas
Just a little heads-up on the nutrition. It’s cake, so you know, it’s a treat! This is just an estimate per slice.
| Nutrient | Approximate Amount |
|---|---|
| Calories | 550 kcal |
| Sugar | 60g |
| Fat | 30g |
| Protein | 5g |
As for what to serve it with? A big scoop of vanilla bean ice cream is a classic for a reason. Or just a tall, cold glass of milk. Perfection.
Tips for Leftovers and Storage
If you somehow have leftovers, you can store the cake in an airtight container at room temperature for up to 3 days.
I find it stays more moist at room temp. If you put it in the fridge, the butter in the cake and frosting will get hard. Just let it sit out for 20-30 minutes before serving if you do refrigerate it.
Frequently Asked Questions (FAQ)
Q1. Why did my sprinkles bleed color into the batter?
Ans: You probably used the wrong kind of sprinkles! The little round balls (nonpareils) have a coating that dissolves in wet batter. You need to use the long, skinny ones called Jimmies. Also, be sure to fold them in gently at the very end.
Q2. Why is my cake dry?
Ans: This is usually from one of two things: overbaking or measuring your flour incorrectly. Bake just until a toothpick comes out clean. And when you measure flour, spoon it into your measuring cup and level it off instead of scooping directly from the bag, which packs it in too tightly.
Q3. Can I make this a vegan Funfetti cake?
Ans: Yes! You can experiment with plant-based butters, a dairy-free milk like almond or oat milk, and an egg substitute like flax eggs. The texture might be a little different, but it can definitely be done.
Wrapping Up
There you have it. A homemade Funfetti cake that’s honestly not that hard to pull off and tastes incredible. It’s the perfect cake for birthdays, celebrations, or just a Tuesday when you need some sprinkles in your life.
So go for it! I really hope you try this out and love it as much as I do.
If you make it, I would LOVE to hear how it went. Drop a comment below and tell me all about it, or ask any questions you have. I’m here to help!