

If you’ve ever found yourself standing in front of a Dairy Queen freezer case, just staring longingly at those beautiful layers of chocolate, fudge, cookie crunch, and ice cream, then you’re in the right place.
Because today? You’re about to recreate that exact same magic at home. Yes, with real-deal fudge sauce, cookie crumble that crunches just right, and fluffy whipped topping that actually tastes like whipped cream and not some freezer-burned mystery foam. You’re going to make a homemade Dairy Queen-style ice cream cake that might even ruin the store-bought version for you forever.
But don’t worry—this isn’t some high-stress, culinary-overload kind of project. If you can spread ice cream in a pan and crush a few cookies, you’re already halfway there. This recipe is super doable, incredibly rewarding, and a guaranteed hit at literally any celebration. Or just a Tuesday.
Let’s dive in.
What You’ll Need
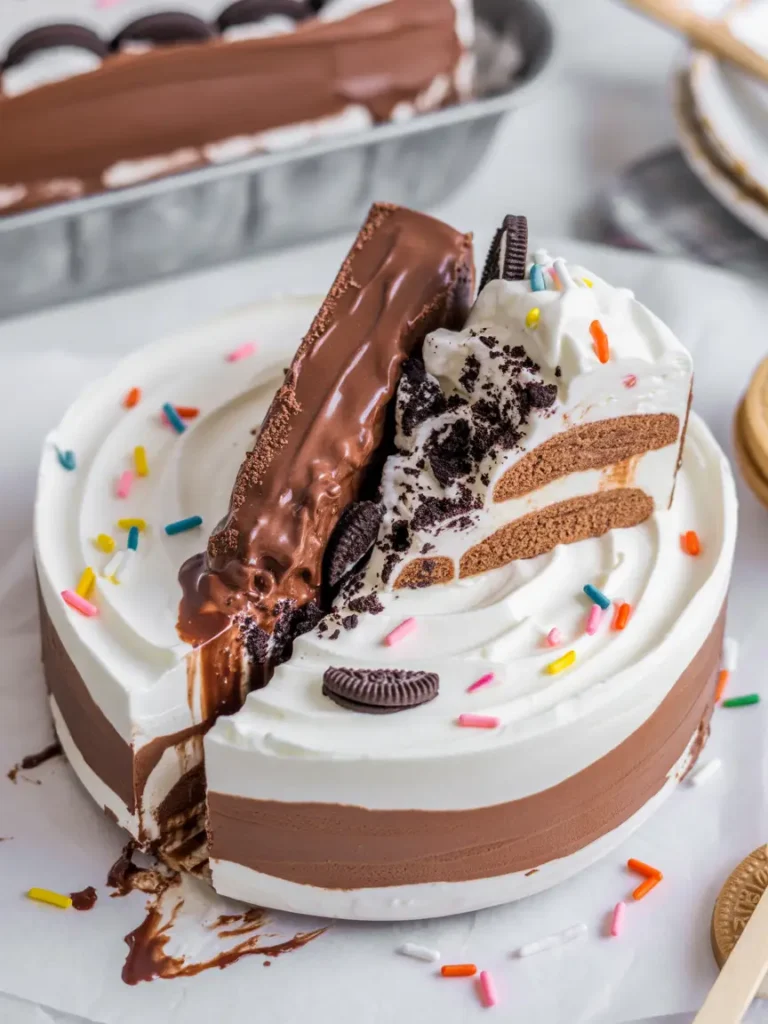
This cake is built in layers, but don’t let that scare you off. Every layer is ridiculously simple. And once you see how it all comes together, you’ll wonder why you haven’t been making this for years.
Ice Cream Layers:
- 1 quart chocolate ice cream
- 1 quart vanilla ice cream
Crunchy Fudge Center:
- 20 Oreo cookies (cream included)
- ½ cup unsalted butter, melted
- 1 cup hot fudge sauce (go thick and rich here)
Whipped Topping:
- 2 cups heavy whipping cream
- 1 cup powdered sugar
- 1 teaspoon vanilla extract
- Optional: rainbow sprinkles (always yes)
Tools You’ll Need
- 9-inch springform pan or regular round cake pan
- Plastic wrap or parchment paper
- Rubber spatula
- Mixer (hand or stand, doesn’t matter)
- Mixing bowls
- Serrated knife
- Offset spatula (optional, but it makes life easier)
Step-by-Step Instructions
1. Prep Your Pan
Line the base and sides of your cake pan with plastic wrap or parchment paper. This little step will save you from the stress of trying to unmold a frozen cake from an unforgiving metal pan. Trust me on this. Leave a few inches hanging over the edges so you can lift the whole thing out once it’s frozen.
2. Chocolate Ice Cream Layer
Take your chocolate ice cream out of the freezer and let it sit at room temperature for about 15–20 minutes. It should be soft enough to spread easily, but not soupy.
Scoop the ice cream into your lined pan and spread it evenly across the bottom using a spatula. Try to get it as flat as possible so your layers stay clean. Freeze for 30 minutes to firm it up.
3. That Legendary Fudge + Crunch Layer
While the chocolate ice cream is freezing, crush your Oreo cookies. You can throw them into a zip-top bag and smash them with a rolling pin, or pulse them a few times in a food processor. Don’t obliterate them—you want small chunks, not dust.
Mix the crushed Oreos with the melted butter until they resemble wet sand. Set aside.
Once the chocolate ice cream layer is firm, warm your hot fudge slightly until it’s pourable, but still thick. Pour it directly on top of the frozen chocolate layer and spread gently. Immediately sprinkle your Oreo crumble evenly over the fudge while it’s still warm. Press the mixture down lightly so it sticks.
Pop the whole thing back into the freezer for another hour or until it’s firm.
4. Vanilla Ice Cream Layer
Same deal here—soften your vanilla ice cream for about 15 minutes, then scoop it over the Oreo layer and spread it evenly. Freeze for at least 4 hours or overnight if you want ultra-clean layers.
5. Whipped Cream Frosting
Chill your mixing bowl and beaters in the freezer for 10–15 minutes before whipping. It makes a big difference.
Whip the heavy cream, powdered sugar, and vanilla until stiff peaks form. This should take about 3–5 minutes depending on your mixer.
Remove your frozen cake from the pan using the plastic wrap overhang. If it’s stuck, wrap a warm towel around the outside of the pan for 30 seconds and try again. Once it’s out, frost the entire cake with your whipped cream and decorate the top with sprinkles, crushed cookies, or whatever makes you happy.
Freeze the finished cake for at least another hour before serving.
Pro Tips You’ll Wish You Knew Sooner
- Don’t rush the freezing time. Each layer needs to be solid before adding the next one. Otherwise? Slippery cake. Sad layers. Trust me, just wait.
- Use a hot knife to slice. Run a sharp serrated knife under hot water, dry it quickly, and slice. Clean. Smooth. Beautiful.
- High-quality fudge matters. Thin, watery fudge won’t give you that classic Dairy Queen texture. Go thick or go homemade.
- Whip your cream fresh. Cool Whip is convenient, but freshly whipped cream has real flavor and better texture.
- Use an offset spatula. It makes spreading and smoothing way easier—especially when working with frozen layers.
Substitutions & Variations
This recipe is super flexible, and that’s part of what makes it so fun. You can totally customize it based on your cravings or dietary needs.
- Dairy-Free: Use coconut milk-based ice creams and a plant-based whipped topping like whipped oat cream or coconut cream. Most Oreos are accidentally vegan, so you’re good there too.
- Flavor Variations: Try strawberry and vanilla with a white chocolate ganache center. Or mint chocolate chip with crushed Andes mints. Or caramel swirl with Biscoff cookie crumble. You get the idea.
- Low Sugar: Opt for reduced-sugar or no-sugar-added ice creams and use a sugar substitute for the whipped cream.
- Nutty Twist: Add a layer of chopped peanuts or almonds with the Oreo crunch for a little salty-sweet combo action.
Can You Make This Ahead?
Absolutely. This is the kind of dessert that’s made for planning ahead. You can assemble the entire cake, frost it, and stash it in the freezer up to two days in advance. Just make sure it’s wrapped well to avoid freezer burn.
If you want to prep even earlier, make just the ice cream and fudge layers first. Then add the whipped cream the day you plan to serve.
Leftovers & Storage Tips
Leftover ice cream cake? Let’s be honest… unlikely. But if you do have a few slices left, here’s how to keep them tasting fresh:
- Store slices in an airtight container or wrap them tightly in plastic wrap.
- Freeze for up to one month.
- Before serving again, let it sit at room temp for 10–15 minutes so it’s sliceable but still frozen and creamy.
Avoid leaving it out too long—refreezing melted layers will mess with the texture.
Nutrition Info (For the Curious)
Here’s a rough breakdown if you’re keeping track:
- Per slice (1/8 of the cake): ~650–750 calories
- Carbs: ~55g
- Fat: ~42g
- Protein: ~6g
Of course, these numbers will vary based on the brands you use. But if you’re making this cake, just enjoy the moment.
Meal Pairing Suggestions
Honestly? This cake steals the show. But if you’re serving it as part of a bigger menu:
- Great after grilled burgers or BBQ chicken.
- Perfect with a cold brew coffee or espresso.
- Serve with fresh summer berries on the side for some bright contrast.
You could even go mini—make this in muffin tins or ramekins for individual servings.
Frequently Asked Questions
Can I use store-bought whipped topping instead of homemade whipped cream? You can, but homemade really does taste better and hold its shape longer. Plus, it’s surprisingly easy to make.
How long should I let it sit before serving? Give it about 10–15 minutes on the counter. You want it sliceable but still frozen. If it’s rock solid, slicing becomes… less fun.
Do I need a springform pan? Nope. Any round pan works—just line it well so you can lift the cake out easily.
Can I swap in other cookies? Absolutely. Golden Oreos, Biscoff cookies, even crushed brownies work. Use what you love.
Wrap Up
So there you have it. A homemade ice cream cake that tastes like childhood birthdays, 90s summers, and pure joy in frozen form. You don’t need any fancy skills or wild ingredients—just a few scoops, a little patience, and a serious love for dessert.
Make it for a birthday. Make it because it’s hot out. Or just make it because you want to.
And when you do, come back and tell me how it went. Did you swap the flavors? Add a secret ingredient? Get rave reviews? I want to hear every delicious detail. Drop a comment below and share your cake adventure.