
“`html
This Homemade Nutter Butter Recipe Will Ruin Store-Bought For You
There are some things from childhood that just hit different. For me, it was the sound of that crinkly orange plastic package and the promise of that super peanut-buttery, crunchy-yet-creamy cookie inside.
Nutter Butters were a TOP TIER lunchbox snack. No debate.
But then you grow up, and you realize you can MAKE them at home. And not just make them, but make them a thousand times better. I’m talking more peanut butter flavor, a filling that’s actually fluffy, and a cookie that has the perfect snap.
So, I went on a mission. A very serious, very important mission to create the perfect homemade Nutter Butter. There were some crumbly failures and some cookies that spread into one giant peanut butter pancake. It was a journey.
But what I ended up with is this recipe. It’s simple, it’s not fussy, and it tastes like pure nostalgia. You’re going to love it.
What You’ll Need
Let’s get all our ducks in a row. It makes the whole process feel less chaotic, you know? Here’s everything for the cookies and that amazing filling.
For the Peanut Butter Cookies:
- 1 ¼ cups all-purpose flour
- ¾ teaspoon baking soda
- ½ teaspoon baking powder
- ¼ teaspoon salt
- ½ cup unsalted butter, softened to room temperature
- 1 cup creamy peanut butter (the regular kind, not natural)
- ½ cup granulated sugar
- ½ cup packed light brown sugar
- 1 large egg
- 1 teaspoon vanilla extract
For the Peanut Butter Filling:
- ¼ cup unsalted butter, softened
- ½ cup creamy peanut butter
- 1 cup powdered sugar
- 1-2 tablespoons milk or cream
Pro Tips
I made a few mistakes so you don’t have to. Here are some things that will make your cookie-making life way easier.
- Use the “Boring” Peanut Butter. I know, I know, we all want to be healthy and use that natural peanut butter where the oil separates. DON’T. For this recipe, you need the classic, fully emulsified stuff like Jif or Skippy. The extra oil in natural peanut butter will make your cookies spread into greasy, sad discs.
- Chill The Dough. Seriously. This is not a suggestion, it’s a rule. Chilling the dough for at least an hour solidifies the fat. In simple terms, this means your cookies will hold their shape in the oven instead of melting all over the pan. Be patient, it’s worth it.
- Don’t Obsess Over the Shape. They don’t need to look like perfect machine-pressed peanuts. Roll two small balls of dough, press them together gently to form a peanut shape, and flatten slightly. Or just make circles! They all taste the same, and “rustic” is just another word for “homemade with love.”
- Whip That Filling Good. When you make the filling, don’t just mix it until it’s combined. Beat it on medium-high speed for a good 2-3 minutes. This makes it light, fluffy, and a million times better than the dense stuff in the package.
Tools Required
You don’t need a professional kitchen for this. Just the basics.
- Electric Mixer (stand or hand mixer)
- Mixing Bowls (at least two)
- Baking Sheets
- Parchment Paper
- Measuring Cups and Spoons
- Spatula
- Cooling Rack
Possible Substitutions and Variations
Want to switch things up? I get it. Here are a few swaps that work well.
| Ingredient | Substitution/Variation | Notes |
|---|---|---|
| Creamy Peanut Butter | Crunchy Peanut Butter | Adds a nice texture! Use it in the cookie or filling. |
| All-Purpose Flour | 1:1 Gluten-Free Baking Flour | Make sure it contains xanthan gum for best results. |
| Large Egg | Flax Egg (1 tbsp ground flax + 3 tbsp water) | For a vegan-friendly version (use vegan butter too). |
| Filling Variation | Add a little cocoa powder | For a chocolate-peanut butter filling. Start with 1 tbsp. |
Make-Ahead Tips
Sometimes you want cookies, but you don’t have time for the whole show. You can break it up.
- The Dough: You can make the cookie dough, wrap it tightly in plastic wrap, and keep it in the fridge for up to 3 days. When you’re ready, just let it sit on the counter for 10-15 minutes to soften up slightly before you roll it.
- Freeze for Later: Shape the cookies, place them on a parchment-lined baking sheet, and freeze them solid. Once they’re frozen, you can toss them all into a freezer bag. They’ll keep for up to 2 months. You can bake them straight from the freezer; just add an extra 2-3 minutes to the baking time.
How to Make Homemade Nutter Butter Cookies
Alright, let’s get to the fun part. Time to bake!
Step 1: In a medium bowl, whisk together the flour, baking soda, baking powder, and salt. Just give it a good mix to make sure everything is evenly distributed. Set it aside.
Step 2: In a large bowl with an electric mixer, beat the softened butter, creamy peanut butter, granulated sugar, and brown sugar until the mixture is light and fluffy. This usually takes about 2-3 minutes on medium-high speed. Don’t rush this part!
Step 3: Add the egg and vanilla extract to the butter mixture. Beat again until it’s all combined, scraping down the sides of the bowl with a spatula to make sure you get everything.
Step 4: Turn the mixer down to low and slowly add the dry ingredients you set aside earlier. Mix only until the flour is just combined. Over-mixing can make your cookies tough, and nobody wants that.
Step 5: Cover the bowl with plastic wrap and chill the dough in the refrigerator for at least 1 hour. Or up to 3 days if you’re planning ahead.
Step 6: When you’re ready to bake, preheat your oven to 375°F (190°C). Line two baking sheets with parchment paper. This stuff is a lifesaver for cleanup.
Step 7: Take a tablespoon of dough and roll it into a ball. Roll another ball the same size. Gently press the two balls together side-by-side to create a rough peanut shape. Place it on the baking sheet and flatten it slightly with your palm or the bottom of a glass.
Step 8: Bake for 9-11 minutes, or until the edges are lightly golden brown. They’ll look a little soft in the center, which is perfect. Let them cool on the baking sheet for 5 minutes before moving them to a wire rack to cool completely.
Step 9: While the cookies are cooling, make the filling. In a bowl, beat the softened butter and peanut butter together until smooth. Add the powdered sugar and mix on low until combined, then increase the speed to medium-high and beat for 2-3 minutes until it’s super light and fluffy. If it’s too thick, add a tablespoon of milk to get the right consistency.
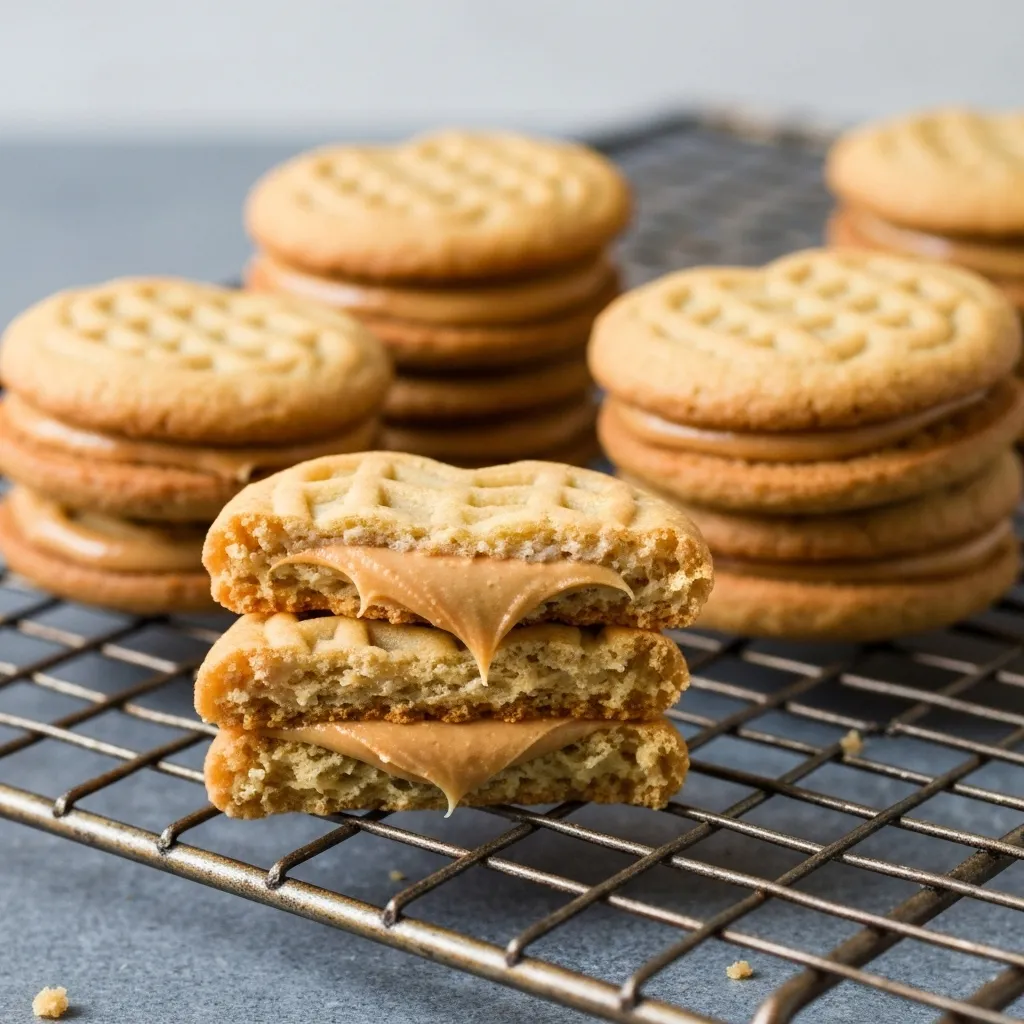
Step 10: Once the cookies are totally cool, spread a generous layer of filling on the flat side of one cookie and top it with another cookie to make a sandwich. Repeat until you have a glorious pile of homemade Nutter Butters.
Nutritional Info, Pairings, and More
Here’s a little extra info that might be helpful.
| Helpful Tidbits | |
|---|---|
| Nutrition (Estimate) | Per cookie sandwich: ~250 calories, 14g fat, 26g carbs, 6g protein. This is just a guess! |
| Pairing Suggestions | A giant glass of cold milk is non-negotiable. Also great with coffee or tea. |
| Efficiency Tips | Make the filling while the first batch of cookies is baking. By the time they cool, you’ll be ready to assemble. |
Leftovers and Storage
IF you have any leftovers, which is a big “if,” here’s how to keep them fresh.
Store the assembled cookies in an airtight container at room temperature. They’ll stay delicious for up to 5 days. You can put them in the fridge, but they might get a little hard. Just let them sit out for a few minutes before eating.
Frequently Asked Questions
Q1. Why did my cookies spread out and get really flat?
Ans: Ah, the most common problem! It’s almost always one of two things: your butter was too soft (it should be room temp, not melty) or you skipped chilling the dough. That chilling step is your best friend for preventing spread.
Q2. Can I make these without an electric mixer?
Ans: You can, but get ready for an arm workout! You’ll need a lot of elbow grease to cream the butter and sugar properly. It’s the key to the cookie’s texture. A mixer makes it much, much easier.
Q3. My filling seems too thick/thin. How do I fix it?
Ans: Super easy fix. If it’s too thick, add milk or cream one teaspoon at a time until it’s the perfect spreadable consistency. If it’s too thin (which is rare), add a little more powdered sugar, a tablespoon at a time.
Q4. How many cookies does this recipe make?
Ans: It depends on how big you make them! But generally, you should get about 15-18 finished cookie sandwiches. Perfect for sharing, or not.
Wrapping Up
And that’s it! You’re now equipped with a recipe that will seriously impress anyone you share these with. Or, you can just make them all for yourself. I fully support that decision.
There’s something really satisfying about recreating a favorite snack from scratch and realizing it’s so much better when it’s made with real, simple ingredients in your own kitchen.
So give it a try. Get a little flour on your nose. You’ve totally got this. When you make them, I’d love for you to come back and leave a comment. Let me know how they turned out or if you have any questions!
“`