
Some mornings you wake up and just know a regular bowl of cereal isn’t going to cut it. You want something that feels a little special, a little fancy, but without a mountain of dishes or a complicated process.
That’s where these Mini German Pancakes come in. I stumbled upon this idea during a weekend when I had promised a “fun breakfast” but had very little motivation to deliver. The magic happened right in my muffin tin.
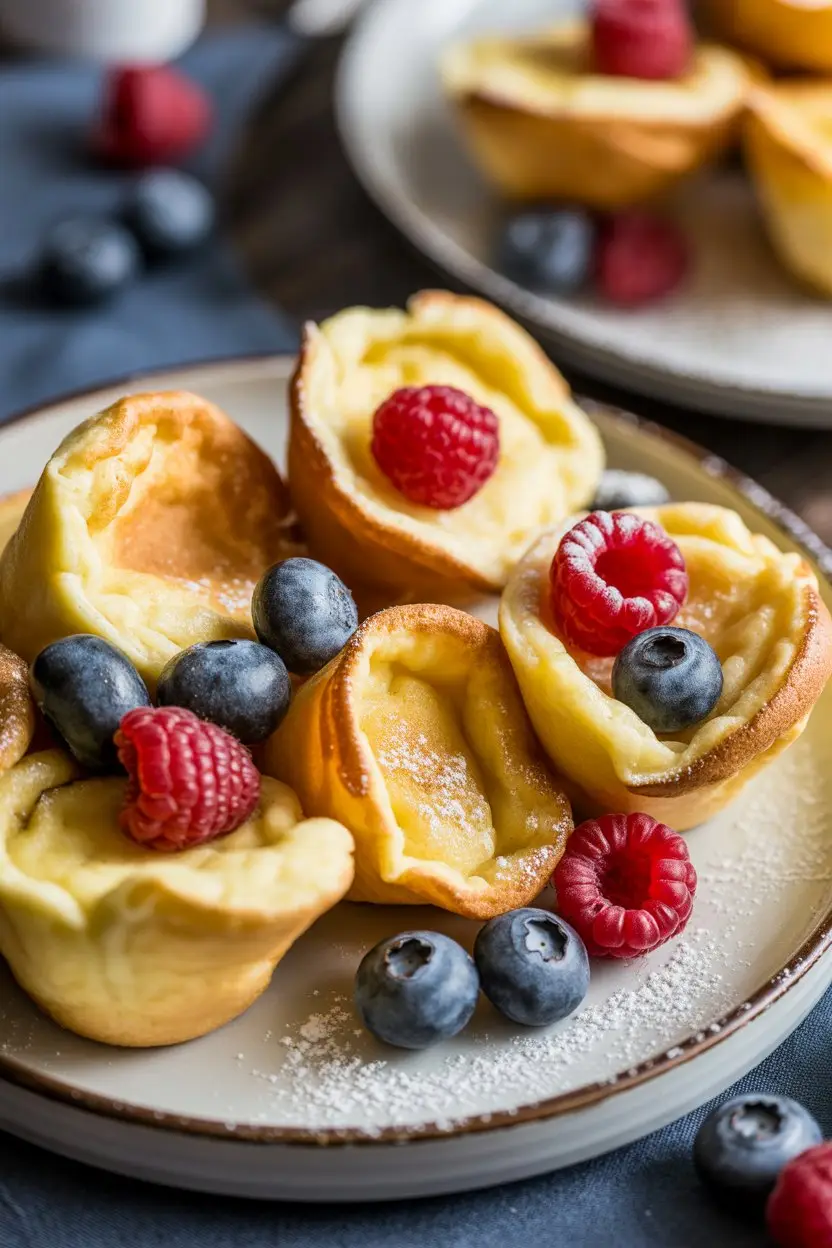
These little guys, also known as Dutch Babies, puff up dramatically in the oven into golden, custardy cups. They have crispy, buttery edges and a soft, tender center, creating the perfect little bowl for your favorite toppings. It’s the kind of breakfast that looks impressive but is secretly one of the easiest things you’ll ever make.
What You’ll Need
The beauty of this recipe is its simplicity. You probably have all of these ingredients sitting in your kitchen right now.
- All-Purpose Flour: Gives the pancakes their structure.
- Eggs: The key to the dramatic puff. Make sure they are at room temperature!
- Milk: Whole milk provides the best richness, but any kind works. Also, bring it to room temperature.
- Sugar: Just a touch for sweetness. You can adjust this based on your toppings.
- Vanilla Extract: Adds that classic warm, bakery-like flavor.
- Salt: A pinch is all you need to balance the sweetness and enhance the other flavors.
- Butter: Unsalted is best. This is for the pan and adds that incredible, rich, crispy edge.
How to Make Mini German Pancakes
This process is surprisingly straightforward. The oven does most of the heavy lifting. Just follow these steps, and you’ll have perfect little puffs of joy.
Step 1: Place your 12-cup standard muffin tin into the oven and preheat it to 400°F (200°C). Heating the pan is a critical step for getting the puff.
Step 2: While the oven heats, combine the eggs, milk, flour, sugar, vanilla, and salt in a blender. Blend for about 30 to 45 seconds, or until the batter is smooth and frothy. Scrape down the sides once to make sure everything is mixed in.
Step 3: Carefully remove the hot muffin tin from the oven. Place about ½ teaspoon of butter into each muffin cup. It should sizzle and melt immediately. Swirl the pan to coat the bottom and sides of each cup.
Step 4: Quickly and evenly pour the batter into the hot, buttered cups, filling each one about halfway to two-thirds full.
Step 5: Immediately return the pan to the oven. Bake for 12-15 minutes. Watch as they puff up high over the edges of the pan and turn a beautiful golden brown.
Step 6: Remove them from the oven. The pancakes will start to deflate almost immediately, which is completely normal! Use a small spatula or a fork to gently lift them out of the tin. Serve warm with your favorite toppings.
Pro Tips
After making these more times than I can count, I’ve picked up a few tricks. These tips will help you get bakery-quality results on your very first try.
- Room Temperature is a Must: I know it’s tempting to grab your eggs and milk straight from the fridge, but don’t. Room temperature ingredients combine better and create a lighter, more dramatic puff. Just leave them on the counter for 30 minutes before you start.
- Don’t Open the Oven Door: Resist the urge to peek! Opening the oven door lets out the hot air, which can cause your pancakes to deflate prematurely and lose their impressive height. Trust the process and wait until they are fully golden brown.
- The Sizzle is Key: The pan must be screaming hot when you add the butter and batter. That initial blast of heat is what creates the steam needed for the puff and develops those irresistible crispy edges. If you don’t hear a sizzle, your pan isn’t hot enough.
- Blender for the Win: While you can whisk this batter by hand, a blender is the fastest way to get a perfectly smooth, aerated batter. It incorporates more air, which contributes to a better rise and a more tender texture. Plus, cleanup is so much easier.
Tools Required
You don’t need any fancy gadgets for this recipe. Just a few kitchen basics will do the trick.
- Standard 12-Cup Muffin Tin
- Blender (or a bowl and whisk)
- Measuring Cups and Spoons
- Small Spatula or Fork
Substitutions and Variations
This recipe is very forgiving. Feel free to experiment with different ingredients to suit your taste or what you have on hand.
For a Savory Twist: Omit the sugar and vanilla. Instead, add a pinch of black pepper, some finely chopped chives, or a tablespoon of grated Parmesan cheese to the batter. Top the finished pancakes with a fried egg, bacon bits, or sautéed mushrooms.
Topping Ideas: The sky’s the limit here. A simple dusting of powdered sugar and a squeeze of lemon is classic. You can also try fresh berries, sliced bananas, a drizzle of maple syrup, a dollop of whipped cream, or a spoonful of jam.
Ingredient Swap Guide
| Dietary Need | Ingredient | Substitution |
|---|---|---|
| Gluten-Free | All-Purpose Flour | Use a 1-to-1 gluten-free baking flour blend. |
| Dairy-Free | Milk & Butter | Use almond, soy, or oat milk and a vegan butter substitute. |
| Lower Sugar | Sugar | Reduce or omit completely. Rely on sweet toppings. |
Make-Ahead and Efficiency Tips
Want to streamline your morning? You can absolutely prepare parts of this recipe in advance.
Make-Ahead Batter: You can blend the batter the night before. Just cover it and store it in the refrigerator. In the morning, give it a quick stir or a few pulses in the blender to re-incorporate everything before pouring it into the hot pan.
Time-Saving Tip: Get everything ready while the oven preheats. Measure out your toppings and have them standing by. These pancakes bake quickly and are best served immediately, so having everything else ready to go makes the process seamless.
Nutritional Information & Meal Pairings
Here’s a rough idea of the nutritional content and some ways to turn these pancakes into a full, satisfying meal.
(Note: Nutrition is an estimate and will vary based on your specific ingredients and toppings.)
| Nutrient | Amount Per Mini Pancake (Approx.) |
|---|---|
| Calories | 75 kcal |
| Protein | 3g |
| Carbohydrates | 8g |
| Fat | 3g |
To round out the meal, serve these mini pancakes alongside some protein like scrambled eggs, crispy bacon, or sausage links. A side of fresh fruit salad or a simple glass of orange juice also pairs beautifully.
Leftovers and Storage
While Mini German Pancakes are undeniably best eaten fresh from the oven, you can save any leftovers.
Store them in an airtight container in the refrigerator for up to 2 days. Keep in mind they will be dense and deflated, not puffy.
To reheat, place them on a baking sheet in a 350°F (175°C) oven or in an air fryer for a few minutes until warmed through. This helps bring back a little of their original crispiness.
Frequently Asked Questions
Here are answers to some common questions that might pop up as you’re making these.
Q1. Why didn’t my pancakes puff up?
Ans: This is usually due to one of three things: your ingredients were too cold, your pan wasn’t hot enough when the batter went in, or you opened the oven door mid-bake. Ensure your milk and eggs are at room temp and the pan is preheated properly.
Q2. Why did my pancakes collapse after baking?
Ans: That’s supposed to happen! The puff is created by steam. As soon as they leave the heat of the oven, the steam escapes and they deflate, creating that signature custardy crater in the middle. It’s a feature, not a flaw!
Q3. Can I make this in a different type of pan?
Ans: Absolutely. You can make one large German pancake in a 10-inch cast-iron skillet or an oven-safe pan. The baking time will be longer, closer to 20-25 minutes.
Q4. Can I freeze them?
Ans: Yes, you can. Let them cool completely, then place them in a single layer on a baking sheet to freeze. Once frozen solid, transfer them to a freezer-safe bag. They can be stored for up to a month. Reheat directly from frozen in the oven.
Wrapping Up
There you have it. A simple, almost magical recipe that turns a handful of basic ingredients into an unforgettable breakfast. It’s the perfect way to make any morning feel a little more special without any of the stress.
The real fun begins when you start experimenting with toppings. So go ahead, give this recipe a try this weekend. I promise it will become a new favorite in your household.
When you make them, I’d love to hear about it! Drop a comment below and let me know how they turned out and what delicious toppings you used.