
Bring the restaurant vibe home with this buttery, garlicky magic.
Ok. Let’s talk breadsticks.
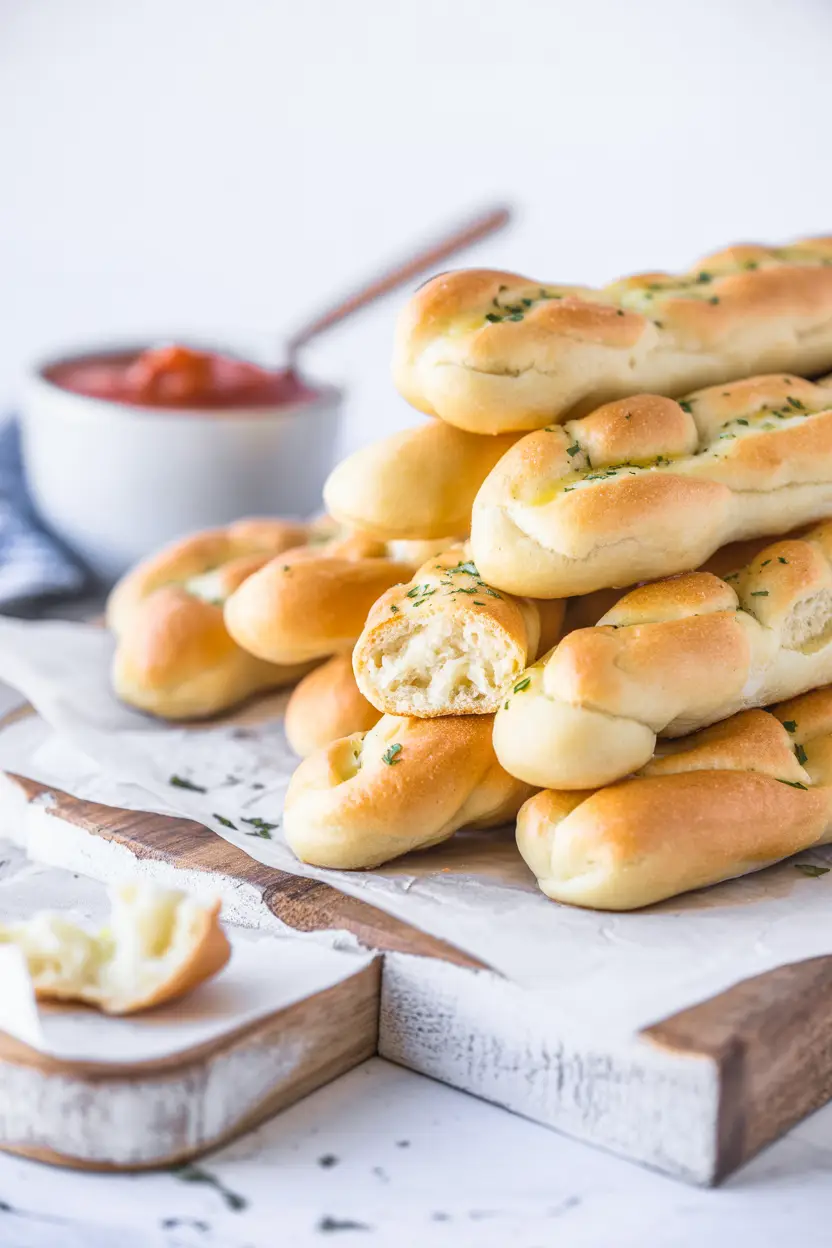
You know the kind. Buttery, golden, pillowy-soft little carbs of happiness that show up at your table at Olive Garden before you’ve even committed to your order. The kind you always say you’ll eat “just one” of… but then you black out and somehow you’re on number four, wiping garlic butter off your shirt, no regrets.
We’re not here to judge. We’re here to recreate that exact breadstick experience at home—because who said comfort food should only live in chain restaurants?
So, whether you’re meal-prepping for the week (bless you) or just want something warm and addictive to eat while watching Netflix with no pants on, you’re in the right place.
Let’s make some breadsticks. And not just any breadsticks. We’re making the ones that will make you proud. The kind you brag about to your mom. The kind you end up “accidentally” eating for dinner.
What You’ll Need
Ingredients
For the dough:
- 1 ¼ cups warm water (not scalding—just bathwater warm)
- 2 ¼ teaspoons active dry yeast (one standard packet)
- 2 tablespoons granulated sugar
- 3 tablespoons olive oil
- 1 ½ teaspoons salt
- 3 to 3 ½ cups all-purpose flour
For the topping:
- ¼ cup unsalted butter, melted
- ½ teaspoon garlic powder
- ½ teaspoon fine salt (or garlic salt if you’re spicy like that)
Optional but cute: finely chopped parsley or oregano for sprinkling on top
Let’s Be Real For a Sec
Baking with yeast can feel intimidating if you’ve never done it before. Maybe your inner voice is whispering, What if I mess it up? or I don’t even know what “proofing” means.
Here’s the deal: breadsticks are a great entry point. They’re low-pressure, they don’t need to look fancy, and the final result is so good that even if they end up a little lumpy, you won’t care because your house will smell like a bakery and your mouth will be full of garlic bread.
So breathe. You got this.
Tools You’ll Need
You don’t need a ton here. Just the basics:
- Large mixing bowl (or stand mixer with dough hook, if you’re fancy)
- Wooden spoon or spatula
- Measuring cups/spoons
- Two baking sheets
- Parchment paper (trust me, it helps)
- Clean kitchen towel or plastic wrap
- Pastry brush (or just use the back of a spoon if you’re improvising)
Pro Tips (Trust Me, These Help)
- Let the yeast proof properly. If it doesn’t get foamy after sitting in warm water with sugar for 10 minutes, your yeast is probably expired. It happens. Just try again.
- Don’t overdo the flour. Start with 3 cups, then gradually add more as needed. Too much flour = dense breadsticks. And we are not here for dense.
- Let the dough rise somewhere warm. An oven that’s turned off with the light on works great. So does a sunny countertop. Yeast likes cozy.
- Brush with butter twice. Once when they come out of the oven, and again just before serving. Yes, twice. We don’t skip garlic butter.
- Don’t worry if they look weird. Breadsticks are meant to be rustic. Misshapen = homemade = delicious.
Let’s Make These
Step 1: Wake up the yeast
In a large bowl, mix warm water, sugar, and yeast. Let it sit for 10 minutes until it looks foamy. This is when the yeast says, “I’m alive and ready to make magic.”
Step 2: Mix the dough
Add the olive oil, salt, and about 1½ cups of the flour. Stir until combined. Keep adding the rest of the flour slowly while mixing until the dough starts pulling away from the sides of the bowl.
Step 3: Knead
If you’re using a mixer, go about 6–7 minutes with the dough hook. If you’re kneading by hand, aim for 8–10 minutes. You want a smooth, elastic dough that bounces back when you poke it.
Step 4: First rise
Grease a clean bowl, plop your dough in, cover with a towel or wrap, and let it rise for about 1 hour or until doubled in size.
Step 5: Shape your sticks
Punch the dough down (politely), divide it into 12–14 pieces, and roll each one into a log—about 7–8 inches long. Line them up on a parchment-lined baking sheet.
Step 6: Second rise
Cover the shaped sticks and let them rise for another 20–30 minutes. Don’t skip this step unless you like hockey pucks.
Step 7: Bake
Preheat your oven to 400°F. Bake for 12–15 minutes or until golden on top.
Step 8: Butter time
While they’re hot, mix your melted butter, garlic powder, and salt. Brush generously on top. Like, really go for it. You earned this.
Optional: sprinkle herbs if you’re feeling fancy.

Substitutions & Variations
You don’t have this…Use this insteadOlive oilMelted butter or avocado oilAll-purpose flourBread flour (for extra chew)Garlic powderGarlic salt or fresh grated garlic (sparingly!)ButterVegan butter or olive oil (for dairy-free)
Want to mix it up?
- Add shredded Parmesan on top before baking.
- Make them sweet with cinnamon sugar instead of garlic.
- Turn them into mini pizzas by adding marinara and cheese.
Can I Make These Ahead?
Yup. Two ways:
- Refrigerate the dough: Make the dough, shape it, then cover and refrigerate overnight. Let them sit at room temp for about an hour before baking.
- Freeze after shaping: Freeze the shaped breadsticks on a tray until solid, then transfer to a bag. When ready, let thaw and rise before baking.
How to Store and Reheat
These are best fresh, but if you have leftovers (who are you), here’s how to keep them awesome:
- Room temp: Store in an airtight bag or container for up to 2 days.
- Fridge: They’ll last 4–5 days, but reheat before eating for max deliciousness.
- Freezer: Cool completely, freeze in zip-top bags. Reheat in oven at 350°F for 5–7 minutes.
Nutrition Breakdown (Per Breadstick, approx.)
NutrientAmountCalories170Fat6gCarbohydrates24gProtein4gSodium210mg
FAQ
Q: Can I use instant yeast instead of active dry? Totally. Just skip the proofing step and mix it right in with the flour.
Q: Why are my breadsticks not soft? They might have too much flour or were baked a tad too long. Next time, check the dough texture before baking—it should be soft and smooth, not dry.
Q: Can I double the recipe? Yes! Just make sure to split the dough between two bowls for rising so it doesn’t get overcrowded.
Q: What should I serve these with? Anything. Literally anything. But especially soup, salad, pasta, or just a bowl of garlic butter and no shame.
Wrap Up
You officially have the tools to make Olive Garden-style breadsticks in your own kitchen, no unlimited salad purchase required.
They’re warm, buttery, and ridiculously good—and once you make them once, you’ll be finding excuses to do it again.
Tried the recipe? Let me know how it went in the comments. Got questions? I got you. Also, if you found a killer twist on this classic (cheese-stuffed, maybe?), I definitely want to hear about it.
Now go make some breadsticks. You deserve it.