
“`html
The Perfect Red, White, and Blue Mini Cheesecakes That Won’t Make You Crazy
You know that feeling? The potluck sign-up sheet goes around for Memorial Day or the Fourth of July, and your eyes immediately scan for the easiest thing to bring.
Then you see it. The empty slot for dessert. A wave of panic might just wash over you. You want to bring something that looks amazing, festive, and tastes like you’re a baking champion.
But you also don’t want to spend eight hours in a hot kitchen, covered in flour, questioning all your life choices. I get it. I’ve been there.
That’s where these little guys come in. These Red, White, and Blue Mini Cheesecakes are my secret weapon. They look seriously impressive, but they’re surprisingly straightforward. You can do this.
What You’ll Need
Let’s get all our ingredients in one place. It makes life so much easier than running back and forth to the pantry.
For the Crust:
- 18 Golden Oreo cookies (the whole cookie, filling and all)
- 4 tablespoons unsalted butter, melted
For the Cheesecake Filling:
- 16 ounces cream cheese, softened to room temperature (this is important!)
- 2/3 cup granulated sugar
- 2 large eggs, at room temperature
- 1 teaspoon pure vanilla extract
- 1/4 cup sour cream, at room temperature
For the Topping:
- 1 cup fresh blueberries
- 1 cup fresh raspberries or sliced strawberries
Tools Required
You don’t need a professional kitchen setup for this, I promise. Here’s the basic gear.
- 12-cup standard muffin tin
- Paper cupcake liners
- Food processor or a large plastic bag and a rolling pin
- Electric mixer (handheld or stand mixer)
- Mixing bowls
- Spatula
- Measuring cups and spoons
Pro Tips
I’ve made my share of mistakes so you don’t have to. Here are a few things I learned that make a huge difference.
- Room Temperature is Not a Suggestion: Seriously. If your cream cheese, eggs, and sour cream are cold, your batter will be lumpy. No amount of mixing will save it. I usually set mine out on the counter an hour or two before I start.
- Don’t Over-Mix the Filling: Once you add the eggs, mix on low speed and only until they are just combined. Over-mixing whips too much air into the batter, which causes the cheesecakes to puff up in the oven and then crack as they cool.
- The Cool Down is Crucial: Don’t just yank them out of the oven and throw them in the fridge. Let them cool gradually at room temperature first. This also helps prevent those pesky cracks on top.
- Press the Crust Firmly: Use the bottom of a small glass or a spice jar to press the cookie crumbs down into the liner. A firm, compact crust is the foundation of a good mini cheesecake.
How to Make Red, White, and Blue Mini Cheesecakes
Alright, let’s get to it. We’ll break it down into simple parts: the crust, the filling, and putting it all together.
Step 1: Prep Your Pan and Oven
Preheat your oven to 325°F (163°C). Line your 12-cup muffin tin with paper liners. Easy enough.
Step 2: Make the Crust
Put the Golden Oreos into a food processor and pulse until you have fine crumbs. If you don’t have a food processor, toss them in a ziplock bag, seal it, and smash away with a rolling pin. It’s surprisingly therapeutic.
Pour the melted butter into the crumbs and pulse or stir until it’s all combined and looks like wet sand.
Step 3: Form the Crusts
Spoon about 1.5 tablespoons of the crumb mixture into each cupcake liner. Use the bottom of a shot glass or a small measuring cup to press the crumbs down into an even, flat layer.
Bake the crusts for 5 minutes. This little pre-bake step helps keep them from getting soggy later. Then, take them out and set them aside.
Step 4: Make the Cheesecake Filling
In a large bowl, beat the softened cream cheese with an electric mixer on medium speed until it’s completely smooth and creamy. Scrape down the sides of the bowl. We don’t want any lumps.
Add the sugar and beat until it’s smooth. Then, add the eggs one at a time, mixing on low speed just until the yellow yolk disappears. Remember what I said about not over-mixing!
Finally, stir in the vanilla extract and the sour cream on low speed until just combined. The final batter should be smooth and silky.
Step 5: Fill and Bake
Divide the cheesecake batter evenly among the 12 cupcake liners, right on top of the crusts. They should be about three-quarters full.
Bake for 18-22 minutes. You’ll know they’re done when the edges are set, but the center still has a very slight wobble to it. They will finish setting up as they cool.
Step 6: Cool Them Down
Let the cheesecakes cool in the muffin tin on a wire rack for about an hour. After an hour, move the whole tin to the refrigerator to chill for at least 4 hours, or preferably overnight. Chilling is key for that perfect cheesecake texture.
Step 7: Decorate and Serve
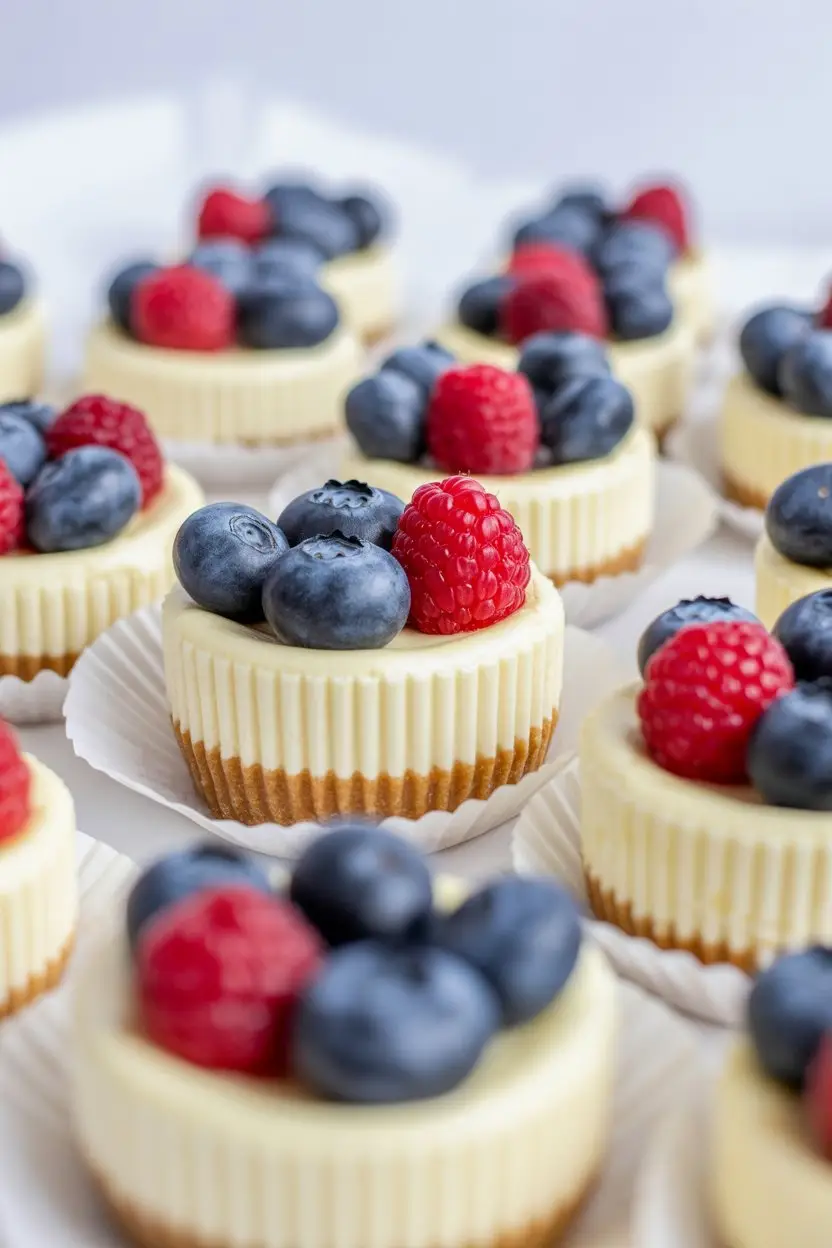
Right before you’re ready to serve, carefully take the mini cheesecakes out of the muffin tin. Top them with your fresh blueberries and raspberries to create that festive red, white, and blue look.
Make Ahead Tips
This is a great recipe to make a day or two before your event. Less stress on party day is always a win.
You can bake the cheesecakes completely and store them, undecorated, in an airtight container in the refrigerator for up to 3 days. Just add the fresh berry topping right before you serve them to keep the fruit from getting weepy.
| Task | Estimated Time |
|---|---|
| Crust Prep | 10 minutes |
| Filling Prep | 10 minutes |
| Bake Time | 22 minutes |
| Cooling & Chilling | 5+ hours |
Substitutions and Variations
Don’t have something on hand? No problem. Cooking is about making things work.
- Cookie Crust: If you can’t find Golden Oreos, vanilla wafers or even shortbread cookies work great. For a classic touch, use regular chocolate Oreos.
- Fruit Topping: Get creative! Sliced cherries, blackberries, or even a swirl of strawberry jam can be used for the topping.
- A Lemony Twist: Add a teaspoon of lemon zest to the cheesecake batter for a bright, citrusy flavor that pairs wonderfully with the berries.
Dietary Swaps and Nutritional Info
For friends with different dietary needs, a few simple swaps can make this recipe work.
| Dietary Need | Suggested Swap |
|---|---|
| Gluten-Free | Use gluten-free vanilla sandwich cookies for the crust. |
| Lower Sugar | Use a sugar substitute (like erythritol) in the filling. |
| Dairy-Free | Use dairy-free cream cheese, butter, and sour cream alternatives. |
Approximate Nutritional Information (per mini cheesecake):
This is just an estimate, and it will change based on the specific ingredients you use.
| Nutrient | Approximate Amount |
|---|---|
| Calories | 320 kcal |
| Fat | 22g |
| Carbohydrates | 26g |
| Protein | 5g |
Leftovers and Storage
If you somehow have leftovers, which is a big “if,” storing them is easy.
Place the mini cheesecakes in an airtight container. They will keep in the refrigerator for up to 4 days. The berries might get a little soft, but they’ll still be delicious.
You can also freeze them! Place the undecorated cheesecakes on a baking sheet and freeze until solid. Then, wrap each one individually in plastic wrap and store them in a freezer bag for up to a month. Thaw in the fridge overnight before topping and serving.
Frequently Asked Questions
Q1. Why did my mini cheesecakes crack on top?
Ans: This is the classic cheesecake problem. It’s usually caused by one of two things: over-mixing the batter after adding the eggs (which adds too much air) or a sudden temperature change. Let them cool down slowly!
Q2. Can I make this as one large cheesecake instead of minis?
Ans: Absolutely. You can press the crust into the bottom of a 9-inch springform pan. The filling amount is perfect. You’ll need to increase the baking time significantly, likely to around 45-55 minutes.
Q3. My crust was kind of soggy. What did I do wrong?
Ans: A soggy crust is a bummer. This usually happens if the crust isn’t pressed down firmly enough or if you skipped the 5-minute pre-bake step. That little bit of time in the oven really helps set the crust and creates a barrier against the wet filling.
Q4. Are fresh or frozen berries better for the topping?
Ans: For topping, fresh is definitely the way to go. Frozen berries will release a lot of juice as they thaw, which can make the tops of your cheesecakes watery and messy.
Wrapping Up
So there you have it. A festive, delicious dessert that looks like you’re a professional pastry chef, but is simple enough for a weekend project.
These little cheesecakes are always a huge hit at parties, and nobody needs to know how easy they were to whip up. That can be our little secret.
If you give this recipe a try, I’d love to hear how it went! Drop a comment below and let me know if you made any fun variations or if you have any questions. I’m always happy to help.
“`